Installation and Deployment
This document applies to both the Personal Edition and Enterprise Edition of the software. The installation procedures for both editions are identical!!!
Please first download the installation package. The default account is admin/admin.
To help you understand the configuration parameters required during installation, please first review the feature design related to Log Monitoring.
Local Deployment (Standalone Version)
Preparation
- Java Environment: Ensure that JDK is installed on your server and the environment variables are properly configured. Recommended versions include JDK 8, JDK 11, and JDK 17.
- Download and Extract: Download the installation package and extract it to the desired installation directory.
- OpenSSL 3: If you're using a Linux server, install OpenSSL 3. Refer to here for instructions.
NOTE
Most modern Linux distributions already come with OpenSSL 3. You can check the version by running openssl version.
Database Initialization
- Metadata Database: Supports MySQL, PostgreSQL, or built-in SQLite. For MySQL or PostgreSQL, run the initialization script
sql/ddl_mysql.sqlorsql/ddl_postgres.sql. For SQLite, no additional initialization is needed. - Access Log Database: Supports ClickHouse, MySQL, or PostgreSQL. Run the corresponding initialization script:
sql/access_log_clickhouse.sql,sql/access_log_mysql.sql, orsql/access_log_postgres.sql.
IMPORTANT
If you choose MySQL or PostgreSQL for the access log database, it's recommended to deploy it on a separate physical instance from the metadata database to ensure resource isolation.
Configuration Parameters
- Modify the following settings in the
conf/application.propertiesfile:
# Unified root path for API access, e.g., http://192.168.xx.xx:8520/api/xxx
# API context
dbapi.api.context=api

# Default embedded SQLite metadata database; otherwise, specify an external database
spring.datasource.dynamic.datasource.meta-db.driver-class-name=org.sqlite.JDBC
spring.datasource.dynamic.datasource.meta-db.url=jdbc:sqlite::resource:sqlite.db
spring.datasource.dynamic.datasource.meta-db.username=
spring.datasource.dynamic.datasource.meta-db.password=

# Access log writing method: db, kafka, or null
# 'db' means direct connection to the access log database
# 'kafka' means sending logs to Kafka, requiring manual collection into the log database
# 'null' means logging only locally to `logs/dbapi-access.log`, requiring manual transfer to the log database
access.log.writer=null

# Access log database address; recommended options include MySQL, PostgreSQL, ClickHouse, or Doris
spring.datasource.dynamic.datasource.access-log-db.driver-class-name=ru.yandex.clickhouse.ClickHouseDriver
spring.datasource.dynamic.datasource.access-log-db.url=jdbc:clickhouse://127.0.0.1:8123/default
spring.datasource.dynamic.datasource.access-log-db.username=default
spring.datasource.dynamic.datasource.access-log-db.password=123456

# If 'access.log.writer=kafka', configure Kafka broker address and topic
access.log.kafka.topic=dbapi_access_log
spring.kafka.bootstrap-servers=127.0.0.1:9092- Optional: Configure automatic log cleanup.
If you use a log database, you can set up automatic log cleanup. Modify the following settings in conf/application.properties:
# Enable or disable automatic cleanup of access logs (true/false)
access.log.autoClean.enable=false

# Cron expression for scheduling the cleanup task (default: daily at 3:00 AM)
access.log.autoClean.cron=0 0 3 * * ?

# Number of days to retain access logs before cleanup (default: 15 days)
access.log.autoClean.retention.days=15
NOTE
This option is available only in the Enterprise Edition.
- Optional: Change the port number.
Modify the server.port setting in conf/application-standalone.properties:
server.port=8520- Optional: Restrict UI access to specific IPs.
Modify the dbapi.ui.allowed.ips setting in conf/application-standalone.properties:
# In standalone mode, specify which IPs can access the UI; leave blank for all IPs
dbapi.ui.allowed.ips=- Optional: Adjust memory settings.
Modify the standalone_opts value in bin/jvm_env.properties:
#standalone_opts="-Xms1g -Xmx4g -Xmn2g"You can keep the default settings if you prefer.
- Optional: Specify the Java command path.
If you have multiple JDK versions installed, configure this setting to use a specific version. Otherwise, the system will use the Java command specified in your environment variables.
Modify the JAVA_LOCATION value in bin/jvm_env.properties to point to the full path of the Java executable, such as /usr/bin/java:
JAVA_LOCATION="/usr/bin/java"Startup Commands
Linux
- Use scripts to start and stop the service:
# For Ubuntu/Debian systems, use bash instead of sh
bash bin/dbapi-daemon.sh start standalone
bash bin/dbapi-daemon.sh stop standalone

# Restart
bash bin/dbapi-daemon.sh restart standalone

# Check status
bash bin/dbapi-daemon.sh status standalone- To run in the foreground for easier log viewing, execute:
bash bin/dbapi.sh start standaloneWindows
- Right-click
bin/dbapi.ps1and select "Run with PowerShell." - To run in the background, execute
bin/start.ps1using PowerShell. - Stop services started by
bin/start.ps1usingbin/stop.ps1.
NOTE
Logs for the standalone version are stored in logs/dbapi-standalone.log.
NOTE
Windows supports only the standalone mode and does not support cluster mode.
WARNING
After the first startup, the system will automatically exit. You must complete the activation process and restart the service before use.
- Open your browser and navigate to
http://192.168.xx.xx:8520to access the UI.
TIP
If you previously installed an older version, press Ctrl+F5 to force a refresh of your browser cache and avoid issues caused by cached pages.
Local Deployment (Cluster Version)
Cluster Roles
- The cluster consists of three types of service processes:
manager,gateway, andapiServer. - The
manageris the management service, providing a web UI through which you can create data sources, groups, and APIs, as well as manage online debugging, execution, publishing, and deprecation of APIs. There is only onemanagerprocess per cluster. - The
gatewayserves as a gateway, distributing API requests to differentapiServers. There is only onegatewayprocess per cluster. - The
apiServerhandles API requests and executes business logic within the APIs. MultipleapiServersmay exist across the cluster.
Preparation
- Cluster deployment requires Nacos, a database (MySQL or PostgreSQL), and Redis. Please install Nacos (version 1.4.2 recommended), a database (MySQL or PostgreSQL), and Redis beforehand.
- Prepare multiple Linux servers, each equipped with JDK (recommended versions: JDK 8, JDK 11, or JDK 17).
- Install OpenSSL 3 on each Linux server. Refer to here for details.
NOTE
Most modern Linux distributions already include OpenSSL 3. You can verify the version by running openssl version.
Important Notes:
All servers must have synchronized time settings.
If you've enabled a firewall, ensure that the manager can communicate with both the gateway and apiServers, and that the gateway can reach the apiServers.
SSH Keyless Authentication
- Select one machine, host1, as the deployment host and configure passwordless SSH login between host1 and all other machines.
ssh-keygen -t rsa -P '' -f ~/.ssh/id_rsa
cat ~/.ssh/id_rsa.pub >> ~/.ssh/authorized_keys
chmod 600 ~/.ssh/authorized_keys

for ip in host2 host3;     # Replace host2 and host3 with the actual hostnames of your target machines
do
  ssh-copy-id $ip   # You'll need to manually enter the deployment user's password during this process
done
Download and Extraction
- Download the installation package and extract it to the designated directory on the deployment host, host1.
Database Initialization
- For cluster deployments, the metadata database supports MySQL or PostgreSQL. Run the initialization script
sql/ddl_mysql.sqlorsql/ddl_postgres.sqlbeforehand. - The access log database supports ClickHouse, MySQL, or PostgreSQL. Run the corresponding initialization script (
sql/access_log_clickhouse.sql,sql/access_log_mysql.sql, orsql/access_log_postgres.sql) in advance.
IMPORTANT
If you choose MySQL or PostgreSQL for the access log database, it's advisable to deploy it on a separate physical instance from the metadata database to ensure resource isolation.
Configuration Parameters
- Modify the following settings in
conf/application.properties:
#################################### Please configure the properties below #####################################
# Unified root path for API access, e.g., http://192.168.xx.xx:8520/api/xxx
# API context
dbapi.api.context=api

# Metadata database address: Only MySQL or PostgreSQL supported in cluster mode
spring.datasource.dynamic.datasource.meta-db.driver-class-name=com.mysql.cj.jdbc.Driver
spring.datasource.dynamic.datasource.meta-db.url=jdbc:mysql://127.0.0.1:3306/dbapi?useSSL=false&characterEncoding=UTF-8&serverTimezone=GMT%2B8
spring.datasource.dynamic.datasource.meta-db.username=root
spring.datasource.dynamic.datasource.meta-db.password=root

# Access log writing method: db, kafka, or null
# 'db' means direct connection to the access log database
# 'kafka' means sending logs to Kafka, requiring manual collection into the log database
# 'null' means logging only locally to `logs/dbapi-access.log`, requiring manual transfer to the log database
access.log.writer=null

# Access log database address: Recommended options include ClickHouse, MySQL, PostgreSQL, or Doris. If you don't need monitoring features, you can skip configuring the log database.
spring.datasource.dynamic.datasource.access-log-db.driver-class-name=ru.yandex.clickhouse.ClickHouseDriver
spring.datasource.dynamic.datasource.access-log-db.url=jdbc:clickhouse://127.0.0.1:8123/default
spring.datasource.dynamic.datasource.access-log-db.username=default
spring.datasource.dynamic.datasource.access-log-db.password=123456

# If 'access.log.writer=kafka', configure Kafka broker address and topic
access.log.kafka.topic=dbapi_access_log
spring.kafka.bootstrap-servers=127.0.0.1:9092

############################## If cluster mode, please configure the properties below ##############################

# Nacos address: Required for cluster mode
spring.cloud.nacos.server-addr=127.0.0.1:8848
spring.cloud.nacos.discovery.username=nacos
spring.cloud.nacos.discovery.password=nacos
spring.cloud.nacos.discovery.namespace=public

# Redis address: Required for cluster mode
spring.redis.host=localhost
spring.redis.port=6379
spring.redis.database=0
spring.redis.password=
Redis Sentinel Mode
If Redis is running in Sentinel mode, you need to modify the following Redis-related configurations:
spring.redis.sentinel.master=mymaster
spring.redis.sentinel.nodes=192.168.3.10:26379,192.168.3.10:26380,192.168.3.10:26381
spring.redis.password=123456
spring.redis.timeout=2000ms- (Optional) Configure Automatic Log Cleanup
If you are using a log database, you can configure automatic cleanup of logs stored in that database. Modify the following settings in the conf/application.properties file:
# Enable or disable automatic cleanup of access logs (true/false)
access.log.autoClean.enable=false

# Cron expression for scheduling the access log cleanup task (executes daily at 3:00 AM by default)
access.log.autoClean.cron=0 0 3 * * ?

# Number of days to retain access logs before cleanup (15 days by default)
access.log.autoClean.retention.days=15
NOTE
This configuration is supported only in the Enterprise Edition.
- (Optional) Modify Port Numbers
Modify the port numbers for the gateway, manager, and apiServer components as follows:
In the conf/application-gateway.yml file, set the server.port:
server:
  port: 8525
In the conf/application-manager.properties file, set the server.port:
server.port=8523In the conf/application-apiServer.properties file, set the server.port:
server.port=8524CAUTION
If you have enabled a firewall, remember to update the firewall rules after changing ports to ensure that the manager can access both the gateway and apiServer, and that the gateway can access the apiServer.
- (Optional) Adjust Memory Parameters
Modify the values of manager_opts, apiServer_opts, and gateway_opts in the bin/jvm_env.properties file:
# JVM parameters for the manager in cluster deployment
#manager_opts="-Xms512m -Xmx1g -Xmn512m"

# JVM parameters for the apiServer in cluster deployment
#apiServer_opts="-Xms1g -Xmx4g -Xmn2g"

# JVM parameters for the gateway in cluster deployment
#gateway_opts="-Xms1g -Xmx4g -Xmn2g"
You may also choose to leave these settings unchanged.
- (Optional) Configure Java Command Path
If you have multiple versions of JDK installed and wish to use a specific version, configure this setting. If not configured, the system will default to using the Java command specified in your environment variables.
Modify the JAVA_LOCATION value in the bin/jvm_env.properties file by providing the full path to the Java executable, such as /usr/bin/java:
JAVA_LOCATION="/usr/bin/java"WARNING
For cluster deployments, we strongly recommend configuring this setting. The cluster startup script uses SSH to execute Java commands remotely; however, SSH does not automatically load environment variable configurations, which could result in the system failing to recognize the correct Java command.
- Modify the
conf/install_config.conffile to specify the machine nodes to be installed:
# IP addresses or hostnames of all machines where DBApi is to be installed, separated by commas
ips=host1,host2,host3

sshPort=22

# Host on which the gateway is to be installed
gateway=host1

# Hosts on which the apiServer is to be installed, separated by commas
apiServers=host1,host2,host3

# Host on which the manager is to be installed
manager=host2
Copy Installation Files
- Copy the installation files from
host1to the same directory on each target machine. You can use a script to automate this process:
bash bin/scp-host.shStart Commands
- Cluster operation scripts:
# Start the entire cluster with one command
bash bin/start-all.sh

# Stop the entire cluster with one command
bash bin/stop-all.sh

# Check the status of the entire cluster with one command
bash bin/status-all.sh

# Manually start or stop individual services
bash bin/dbapi-daemon.sh start gateway
bash bin/dbapi-daemon.sh start manager
bash bin/dbapi-daemon.sh start apiServer

bash bin/dbapi-daemon.sh stop gateway
bash bin/dbapi-daemon.sh stop manager
bash bin/dbapi-daemon.sh stop apiServer

# Manually restart individual services
bash bin/dbapi-daemon.sh restart gateway
bash bin/dbapi-daemon.sh restart manager
bash bin/dbapi-daemon.sh restart apiServer

# Manually start individual services in the foreground (logs displayed in the terminal)
bash bin/dbapi.sh start gateway
bash bin/dbapi.sh start manager
bash bin/dbapi.sh start apiServer
INFO
Note: On Ubuntu/Debian systems, please use bash commands instead of sh commands.
NOTE
In the cluster edition, the gateway, apiServer, and manager processes each maintain their own log files, located at logs/dbapi-gateway.log, logs/dbapi-apiServer.log, and logs/dbapi-manager.log, respectively.
WARNING
The first time the system starts, it will automatically exit. You must perform an activation process (activate) and then restart the system to continue using it. Be sure to activate! Activate! Activate! A license is required to use this software—please apply for a license!
- Access the UI via your browser at
http://192.168.xx.xx:8523. APIs are accessed through thegatewayathttp://192.168.xx.xx:8525/api/xx.
TIP
If you previously used an older version, clear your browser cache by pressing Ctrl+F5 to force a hard refresh.
MCP Installation
The MCP service is an independent component of DBAPI that can be deployed separately from the standalone or clustered editions of DBAPI. Even without using the MCP service, DBAPI’s core functionality remains fully operational.
Preparation
- Ensure that the standalone or clustered edition of DBAPI has been successfully installed and is running properly. The MCP service can only function when DBAPI is available.
Configuration Changes
- Navigate to the DBAPI installation directory and edit the
mcp/mcp-config.yamlfile:
base_url: "http://127.0.0.1:8520"
admin_username: "admin"
admin_password: "admin"
mcp_port: 8526
refresh_interval: 60- Parameter descriptions:
base_url: The base URL for accessing DBAPI. For cluster deployments, enter the address of themanagerservice.admin_usernameandadmin_password: Administrator credentials for DBAPI.mcp_port: The listening port for the MCP service.refresh_interval: The interval (in seconds) at which the MCP tool refreshes its data, defaulting to 60 seconds.
Starting the MCP Service
- After entering the DBAPI installation directory, execute the following commands:
# Start in the background
bash bin/dbapi-mcp.sh start

# Stop, check status, or restart
bash bin/dbapi-mcp.sh stop
bash bin/dbapi-mcp.sh status
bash bin/dbapi-mcp.sh restart

# Start in the foreground
bash bin/dbapi-mcp.sh fg- On Windows systems, double-click
bin\dbapi-mcp.batto launch the MCP service.
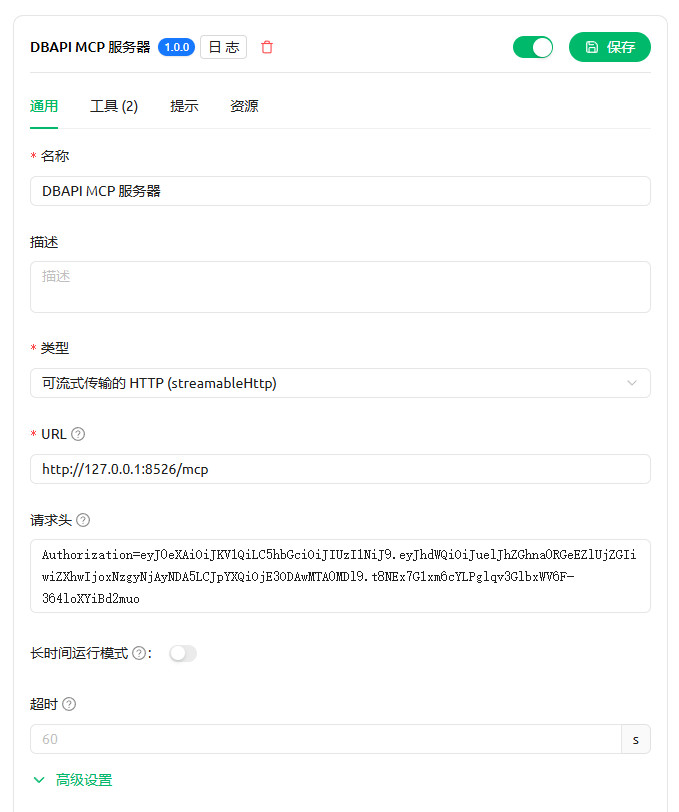
Using the MCP Service
- By default, the MCP service listens on
http://127.0.0.1:8526, with endpoints accessible athttp://127.0.0.1:8526/mcp. - The MCP service uses the
streamableHttpmethod by default. - When accessing private APIs, a token is required. Clients calling the MCP service must include an
Authorizationheader in their requests, formatted as:
Authorization: <token>- Tokens can be obtained via DBAPI's Token API. For example, Cherry Studio configures it as follows:
Appendix
- Quick Docker Installation of Nacos:
docker run --env MODE=standalone --name nacos -d -p 8848:8848 nacos/nacos-server:1.4.2