DBAPI User Guide
Product Introduction
DBAPI is a low-code tool designed for data warehouse developers. By simply writing SQL queries and configuring parameters on the page, it can automatically generate HTTP APIs. It helps programmers quickly develop backend data interfaces, particularly suitable for creating backend APIs for BI reports and data visualization dashboards.
DBAPI serves as the central management hub for all enterprise data APIs, functioning as a platform to manage external data services. It provides dynamic API creation and publishing capabilities, unified API management, and client-side administration features, enabling monitoring of client API calls and control over client access permissions.
Core Features
- ✅ Out-of-the-box: No coding required; no dependency on other software (in standalone mode, only a Java runtime environment is needed).
- ✅ Lightweight Deployment: Extremely low resource consumption; a 2-core, 4GB server can run stably.
- ✅ Multi-platform Support: Supports both standalone and cluster modes, compatible with Windows, Linux, and macOS.
- ✅ Dynamic Configuration: Allows dynamic creation and modification of APIs and data sources, with seamless hot deployment.
- ✅ Access Control: Offers API-level permission management, supporting IP whitelisting/blacklisting.
- ✅ Wide Compatibility: Supports all JDBC-compliant relational databases (MySQL, SQL Server, PostgreSQL, Oracle, Hive, Dameng, Kingbase, Doris, OceanBase, GaussDB, etc.).
- ✅ Dynamic SQL: Supports MyBatis-style dynamic SQL, providing integrated SQL editing, execution, and debugging.
- ✅ Comprehensive Support: Supports SELECT, INSERT, UPDATE, DELETE statements, as well as stored procedure calls.
- ✅ Transaction Management: Enables multi-SQL execution with flexible transaction control.
- ✅ Plugin Extensions: Offers rich plugin mechanisms for caching, data transformation, failure alerts, parameter processing, and more.
- ✅ Easy Migration: Supports API configuration import/export, facilitating smooth migration between test and production environments.
- ✅ Parameter Handling: Supports passing parameters via APIs and complex nested JSON payloads, along with built-in parameter validation.
- ✅ Monitoring & Statistics: Provides queryable API call logs and detailed access statistics.
- ✅ Traffic Control: Implements API rate limiting mechanisms.
- ✅ Workflow Orchestration: Supports complex API workflow orchestration.
- ✅ Open Integration: Offers OpenAPI interfaces for easy integration with other systems.
Basic Concepts
Executor
An executor is an abstraction for executing API business logic. Currently, multiple types are supported:
| Executor Type | Description |
|---|---|
| SQL Executor | Executes SQL statements in a database and returns results |
| Elasticsearch Executor | Executes Elasticsearch DSL queries and returns results |
| HTTP Executor | Acts as an HTTP client, forwards HTTP requests, retrieves results, and returns them |
NOTE
The Personal Edition currently supports only the SQL Executor.
API Group
Used for categorizing and managing APIs, grouping related business functions together for easier maintenance and retrieval.
Client
Refers to applications that call the platform's APIs, such as Python or Java applications. Each client has a unique clientId and secret key secret, created and assigned by the system administrator, who also grants API access permissions.
Quick Start
System Login
Log in using the default credentials: admin/admin.

Data Source Configuration
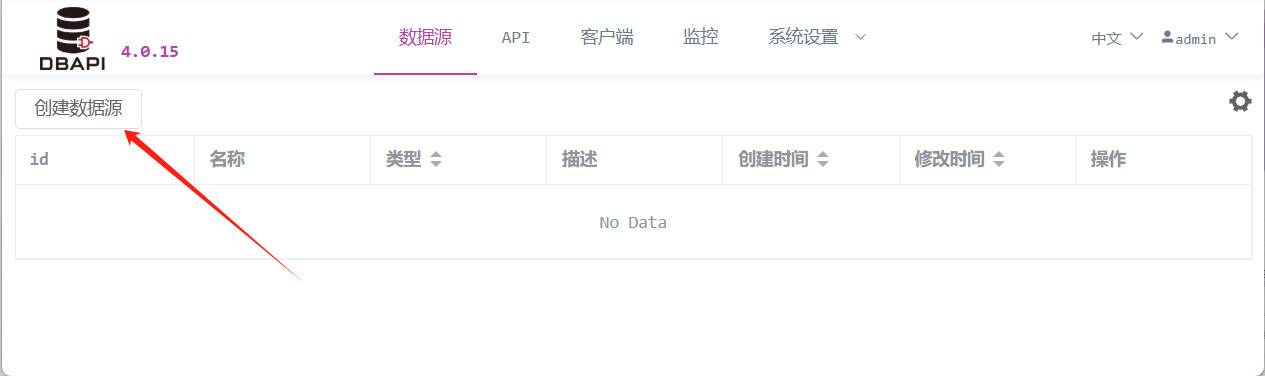
Navigate to the Data Source Management page and click "Create Data Source."
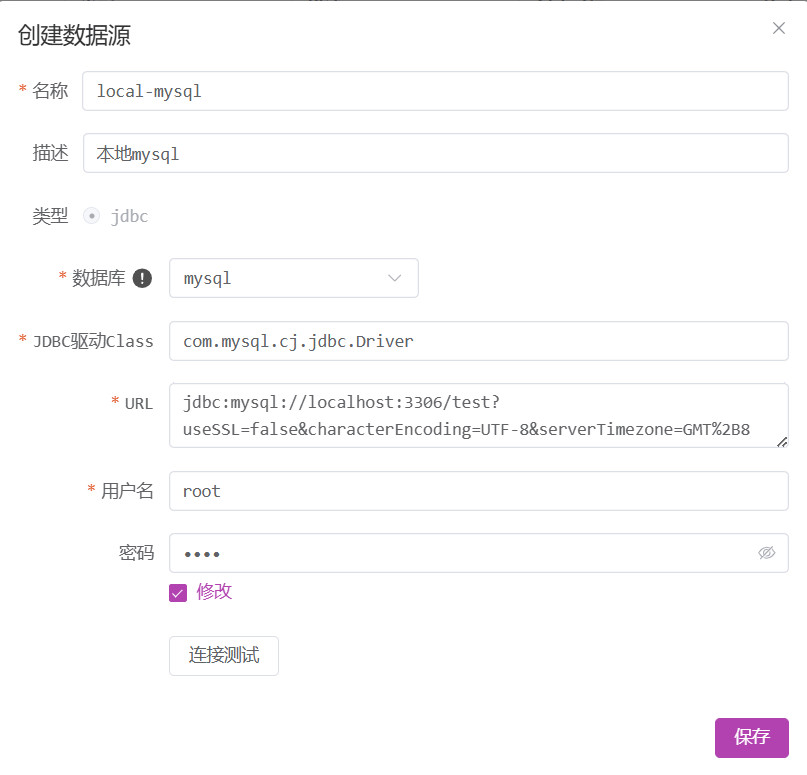
Fill in the database connection details and save.
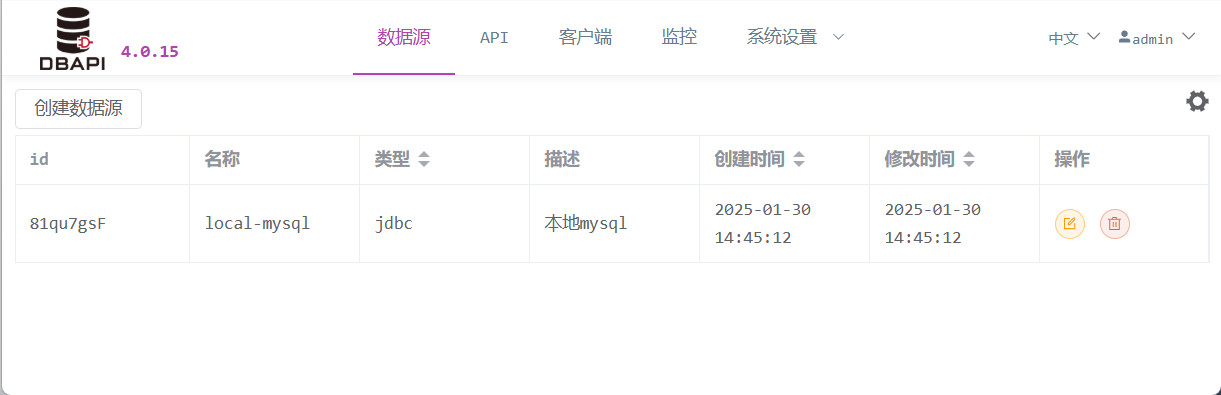
After saving, return to the Data Source page, where you can edit or delete newly created data sources.
Important Notes:
- All databases supporting the JDBC protocol are supported.
- For other database types or Oracle, manually specify the JDBC driver class name and place the corresponding JDBC driver JAR file into either the
extliborlibdirectory before restarting the service (for cluster mode, this must be done on all nodes). - The
libdirectory already includes MySQL, SQL Server, PostgreSQL, and ClickHouse drivers; replace these if their versions do not match. - It is recommended to place your own driver JAR files in the
extlibdirectory for centralized management.
API Creation Process
1. Create an API Group
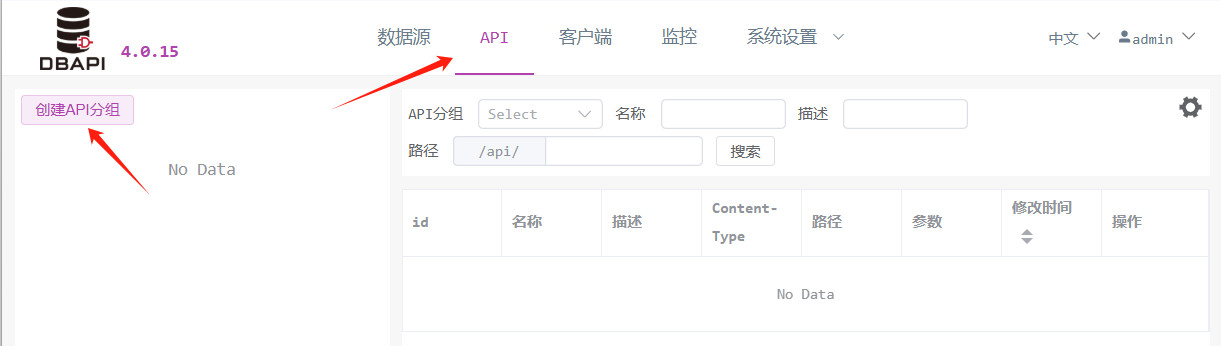
Go to the API Management page and click "Create API Group" on the left.
In the pop-up window, enter the group name and save.
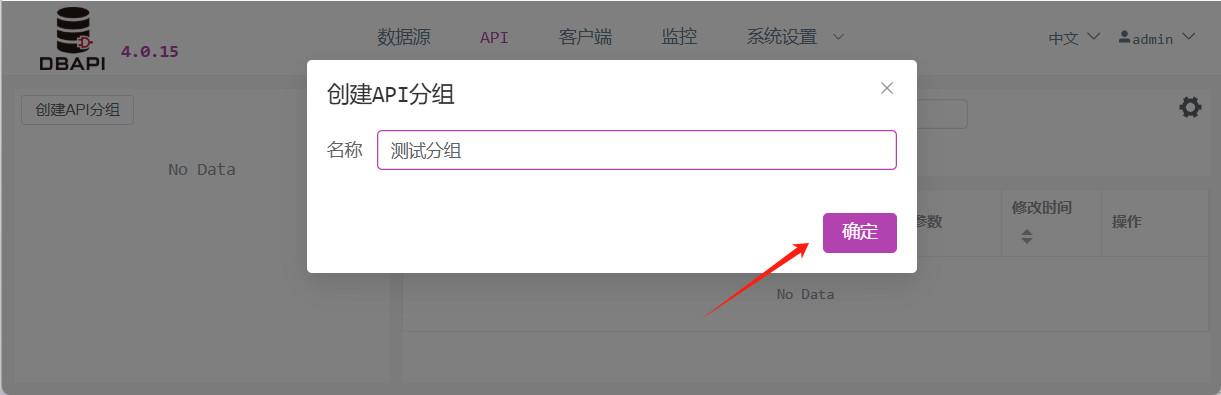
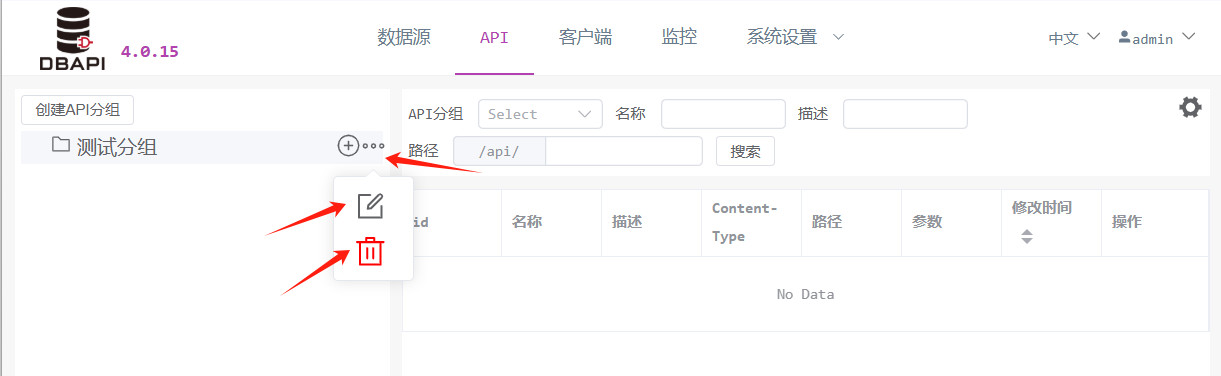
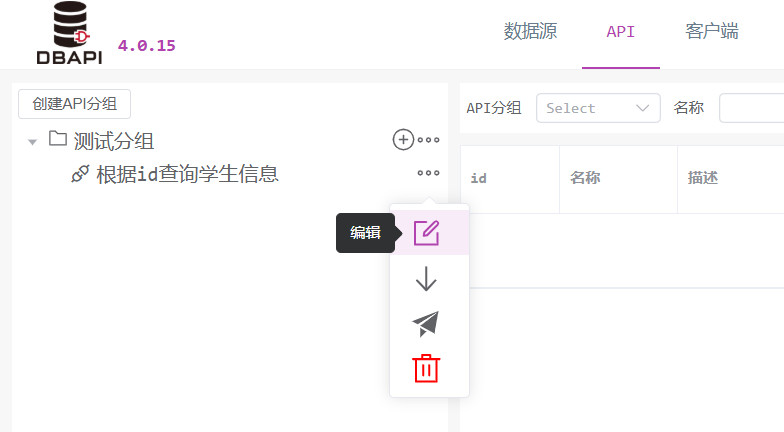
After saving, you will see the new group appear on the left. Click the "More" button next to the group to edit or delete it.
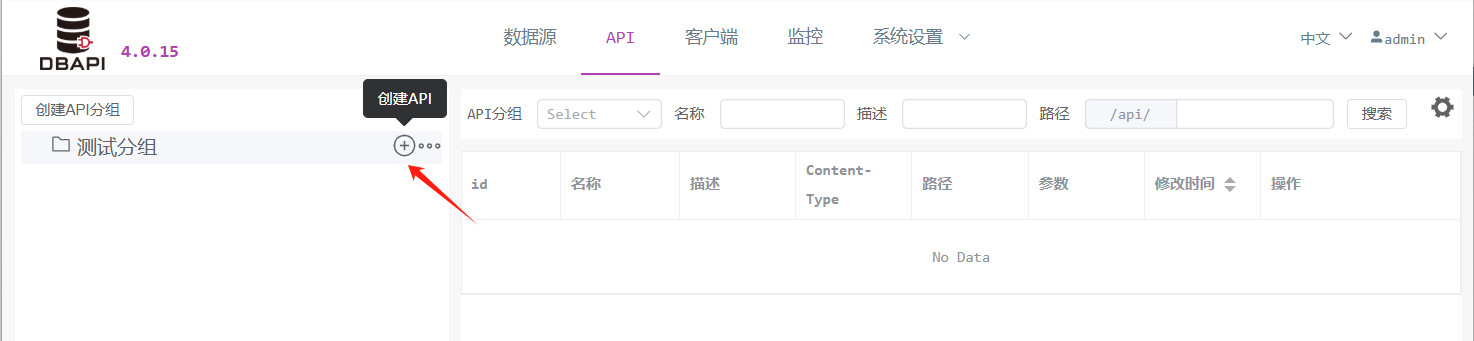
2. Create an API
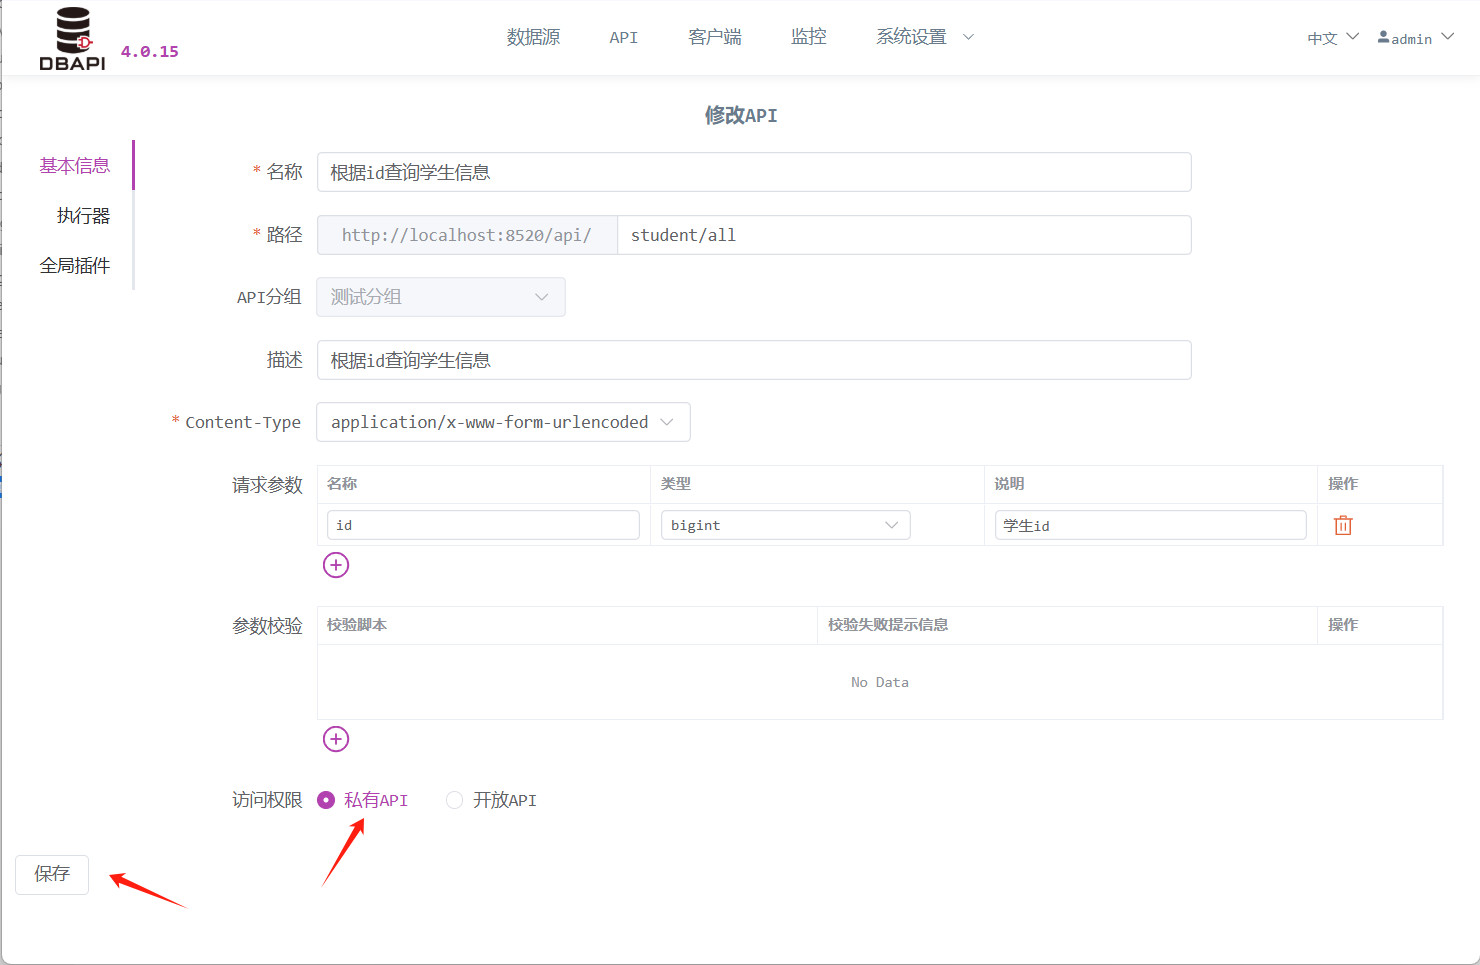
Within the target group, click the "Create API" button to enter the configuration page.
Click "Basic Information" and fill in the API's basic details.
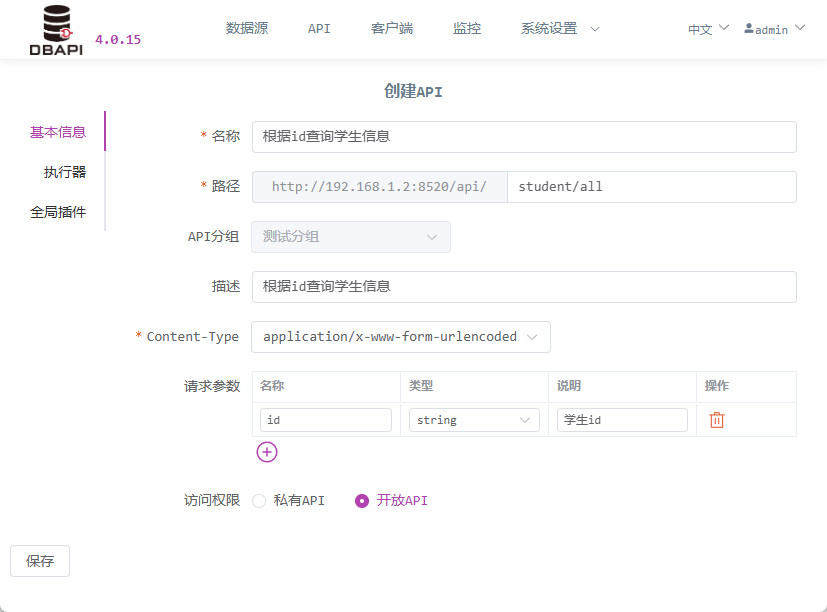
Access Permissions: Public APIs can be accessed directly, while private APIs require clients to obtain a token first (we'll choose public APIs here for testing purposes).
Path: You can configure paths with any number of levels, such as
/a/b/c,/a/b/c/d.Content-Type: If the API uses
application/x-www-form-urlencoded, configure parameters accordingly; if it usesapplication/json, provide a JSON parameter example.Click "Executor" and fill in the executor information.
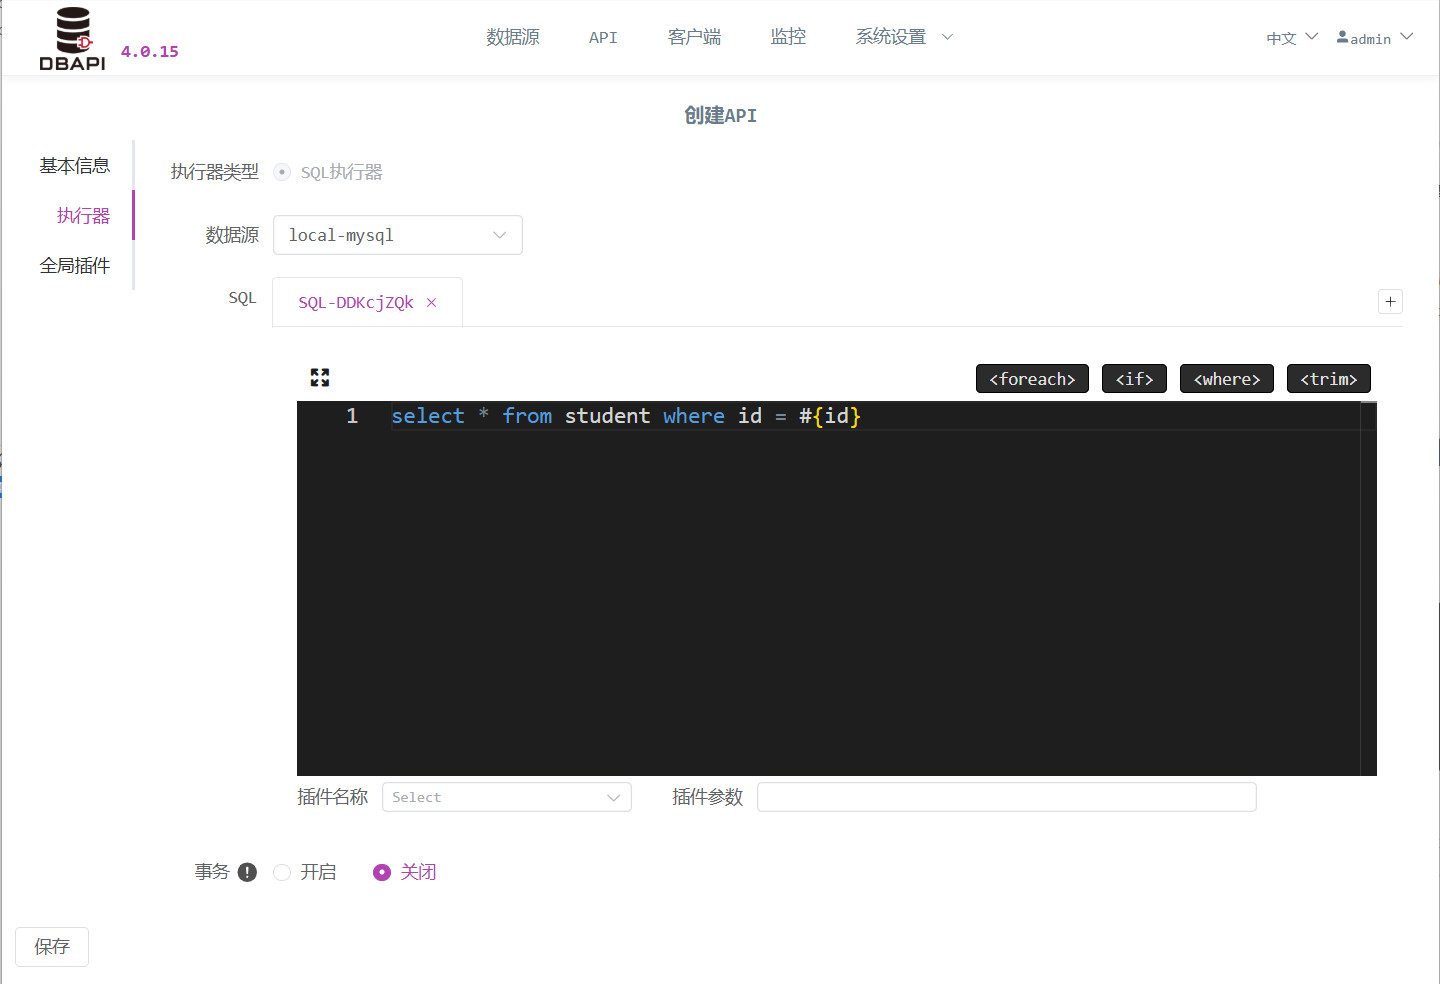
SQL Writing: Use MyBatis dynamic SQL syntax (no need for outer
<select>,<insert>,<delete>, or<update>tags). Parameters are denoted by#{}or${}, and you can refer to the Dynamic SQL Syntax Documentation for details.Transaction Control: Transactions are disabled by default. For
INSERT,UPDATE, orDELETEstatements, consider enabling transactions—this ensures that if any SQL statement fails, the entire transaction will roll back. If an API contains multiple SQL statements, enable transactions so they execute within a single transaction.Important Note: Do not enable transactions for databases like HIVE that do not support transactions; otherwise, errors may occur.
Data Transformation: If data transformation is required, specify the Java class name of the relevant plugin. If no transformation is needed, leave this field blank. If the plugin requires parameters, include them here. Refer to the Plugin Documentation for specifics.
Multiple SQL Statements: Click the "Add" button to open another SQL editing window. An API can execute multiple SQL statements, with the final results combined and returned together—for example, when performing a paginated query that requires both detail and total count results. Each SQL editing window can only contain one SQL statement.
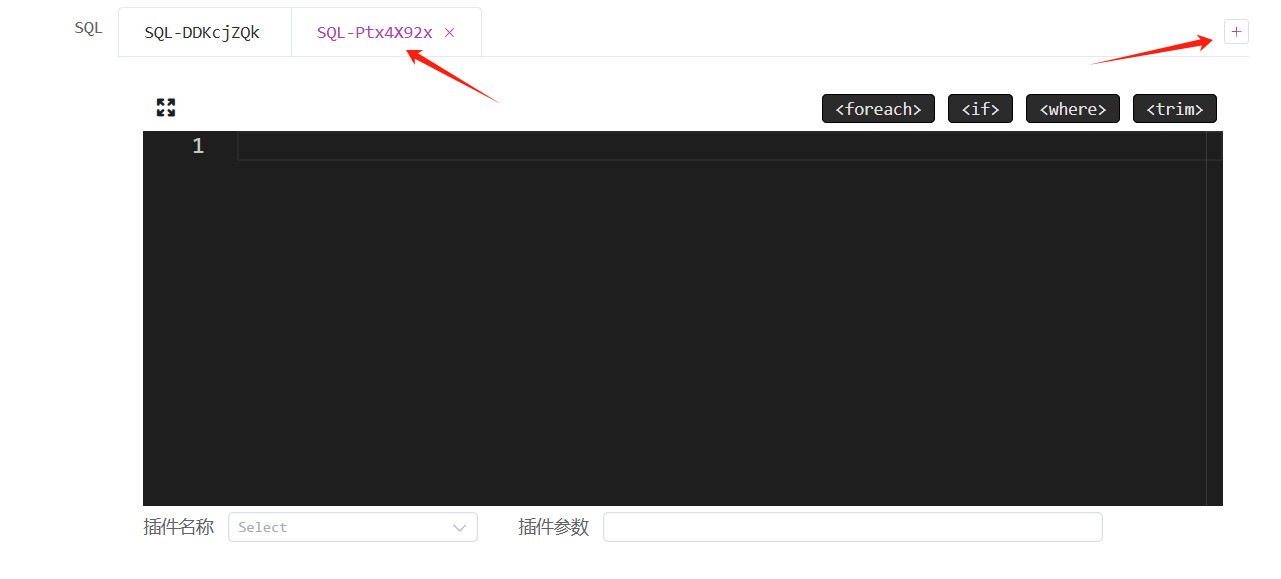
TIP
If an executor contains multiple SQL statements, each SQL corresponds to a separate data transformation plugin configuration. These plugins always operate on the results of a single SQL query.
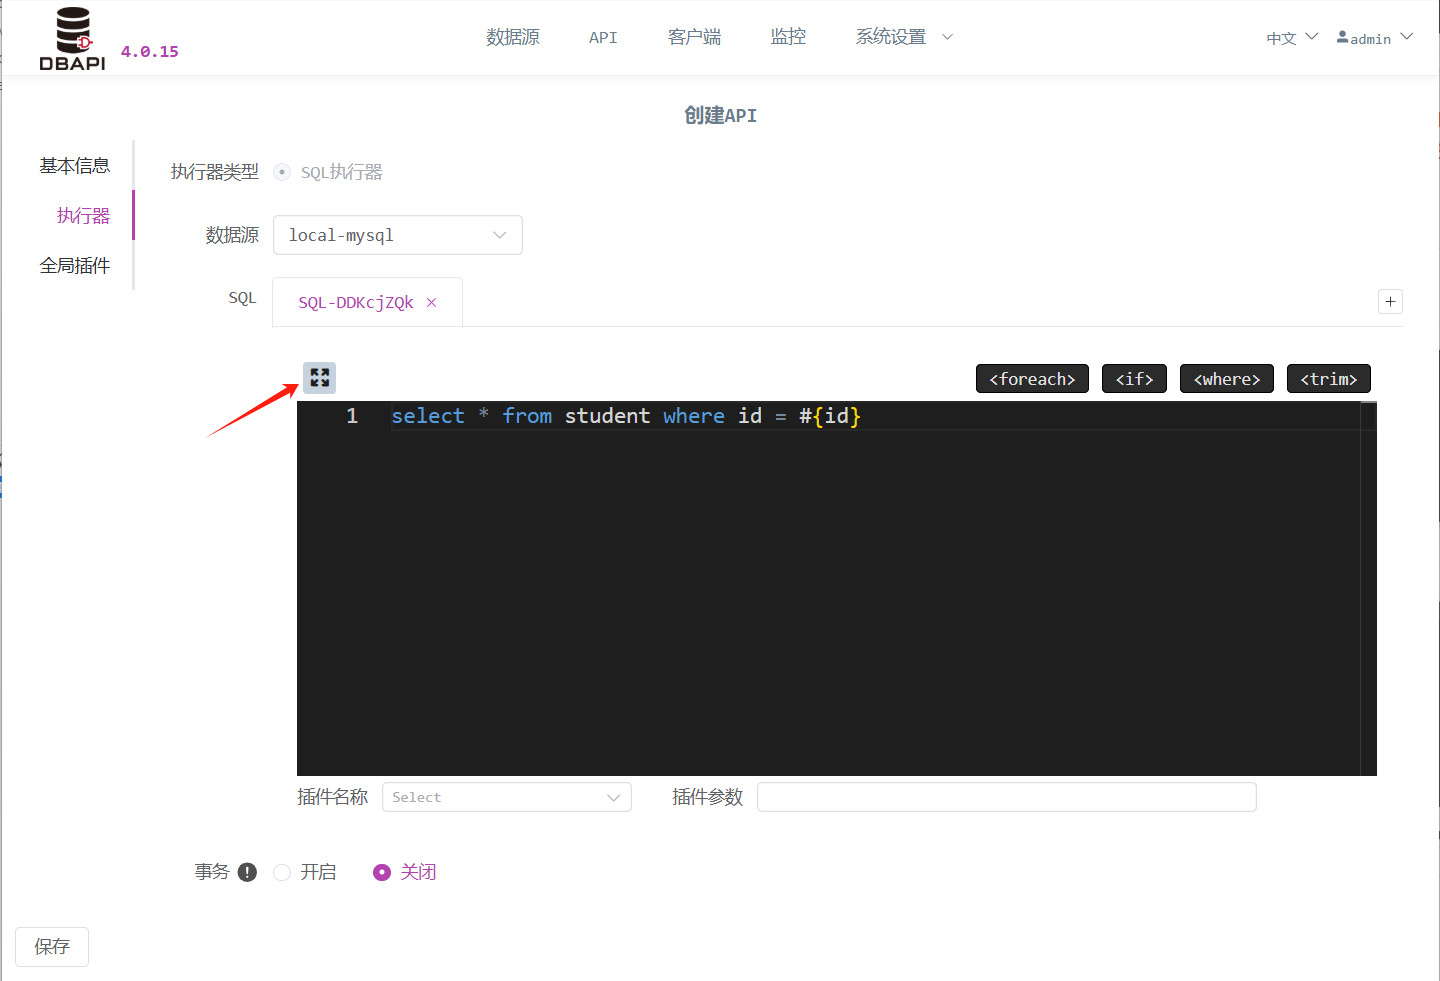
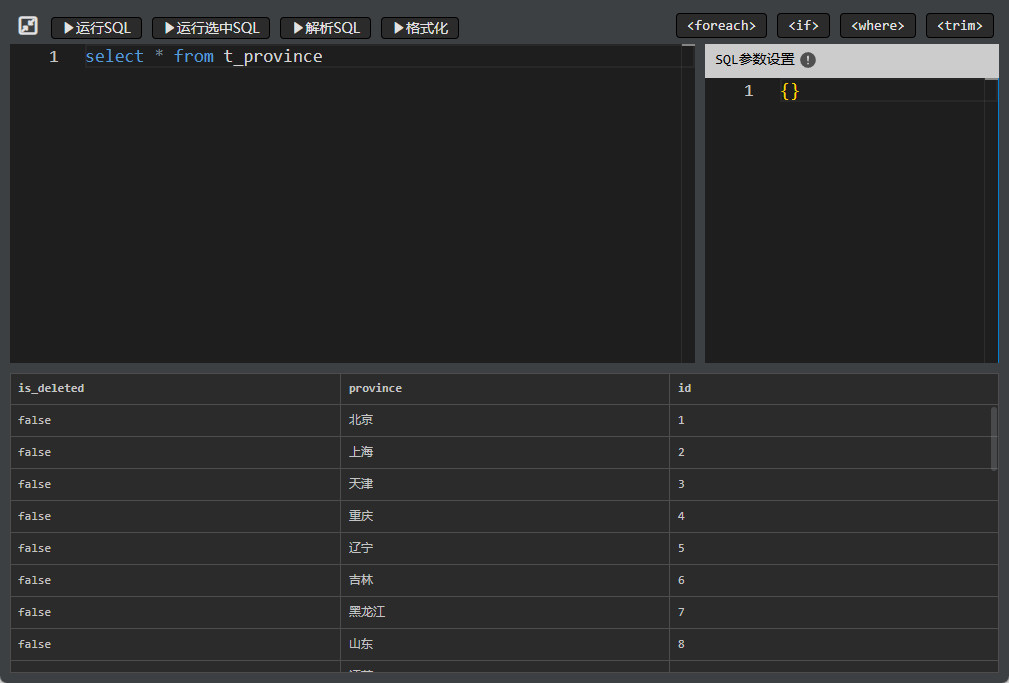
Click the "Maximize Window" button to enter the SQL debugging interface.
Click "Run SQL" to execute the query. If there are parameters in the SQL, set them accordingly.
Click "Global Plugin" to configure global plugin settings.
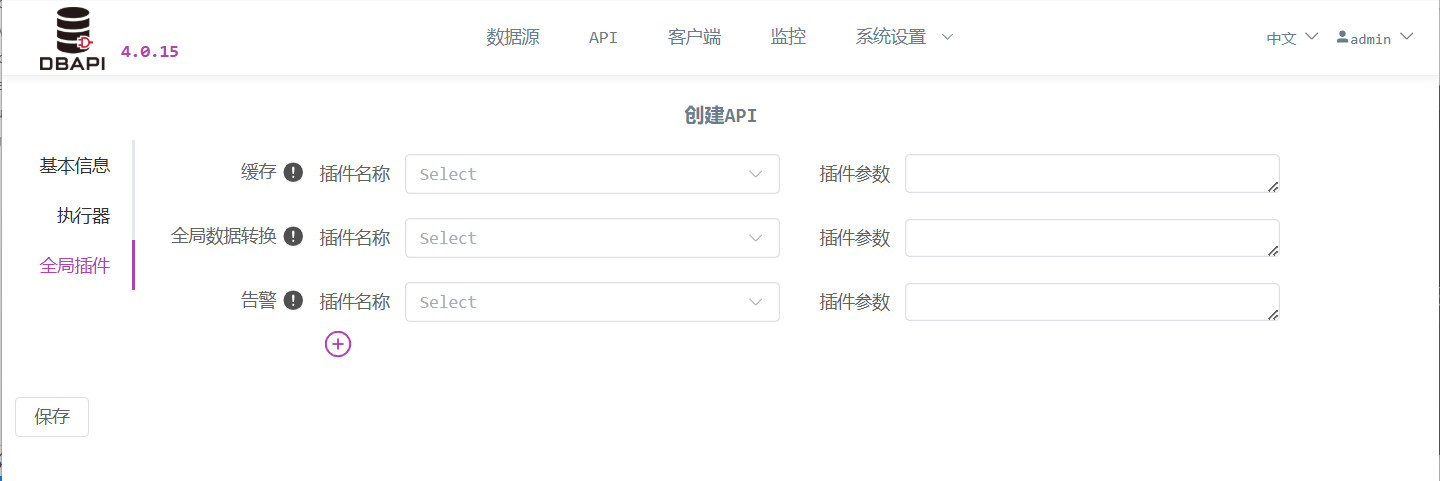
Caching: If data caching is desired, specify the Java class name of the caching plugin. Leave this field blank if caching is not needed. If the plugin requires parameters, include them here.
Alerting: If failure alerts are required during API execution, specify the Java class name of the alerting plugin. Leave this field blank if no failure alerts are needed. If the plugin requires parameters, include them here.
Global Data Transformation: If data transformation is necessary, specify the Java class name of the transformation plugin. Leave this field blank if no transformation is needed. If the plugin requires parameters, include them here.
Parameter Processing: If parameter processing is required, specify the Java class name of the parameter-processing plugin. Leave this field blank if no processing is needed. If the plugin requires parameters, include them here.
Refer to the Plugin Documentation for further details.
Click "Save" to create the API. Return to the API list by clicking the "API" menu.
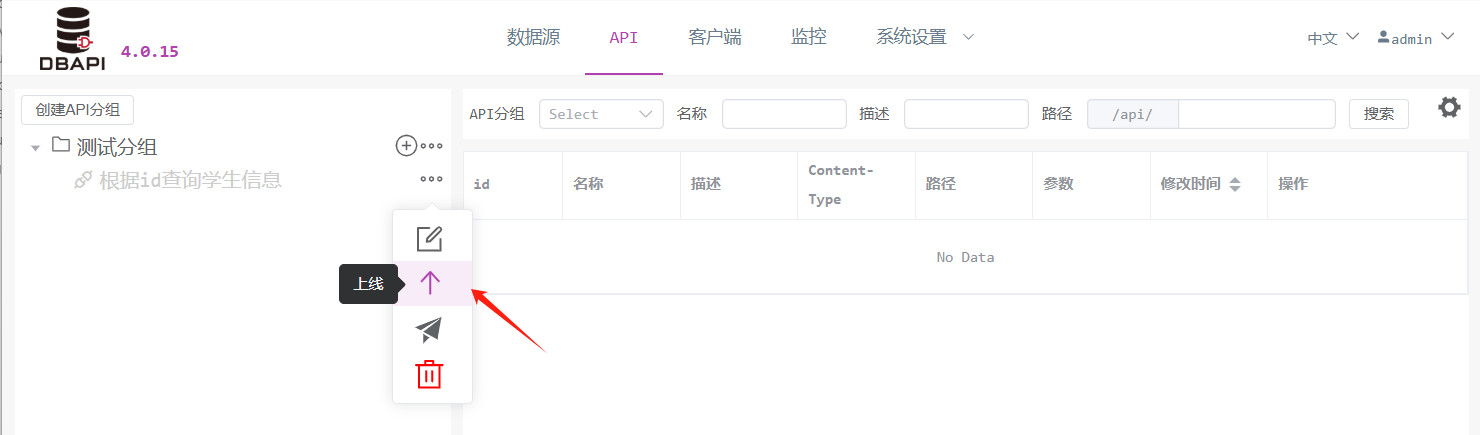
3. Publish the API
Click the "More" button next to the API, revealing the "Publish" option. Click "Publish" to release the API.
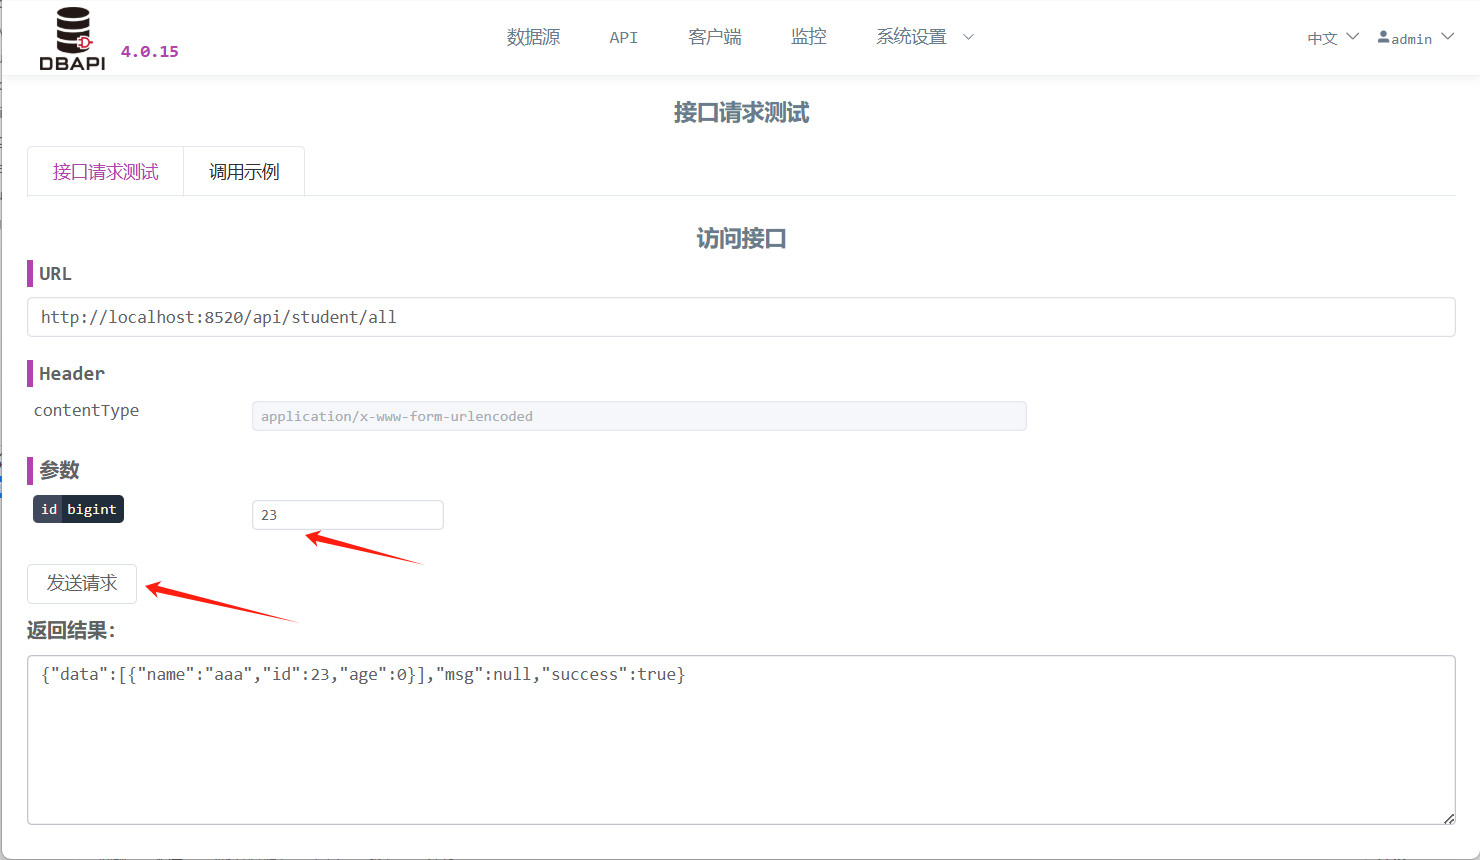
Click the "More" button again, revealing the "Request Test" option. Click "Request Test" to enter the request-testing page.
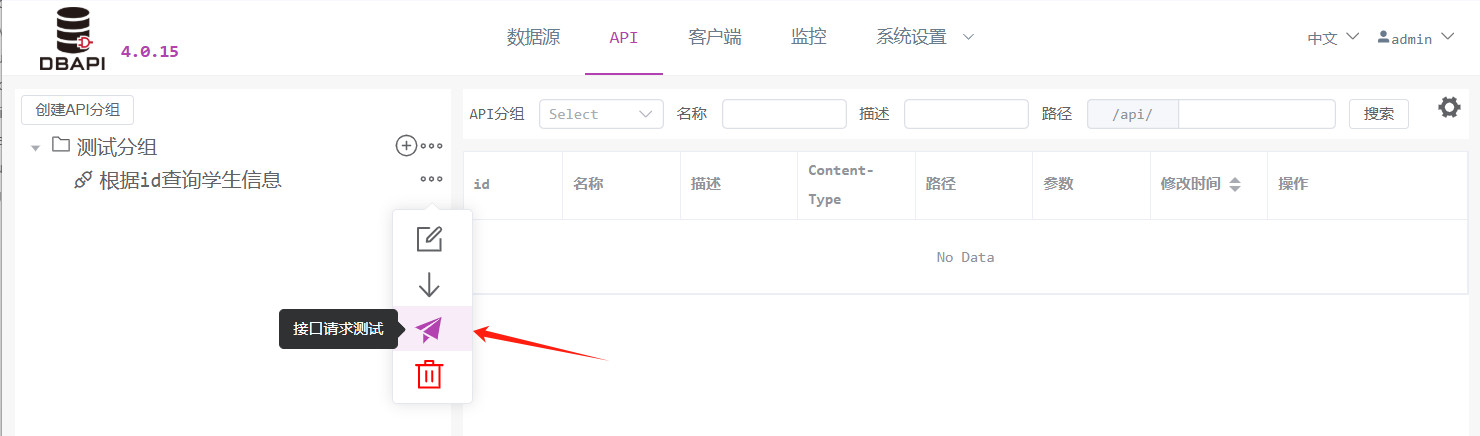
Click "Send Request" to initiate the request. If parameters are required, fill them in accordingly.
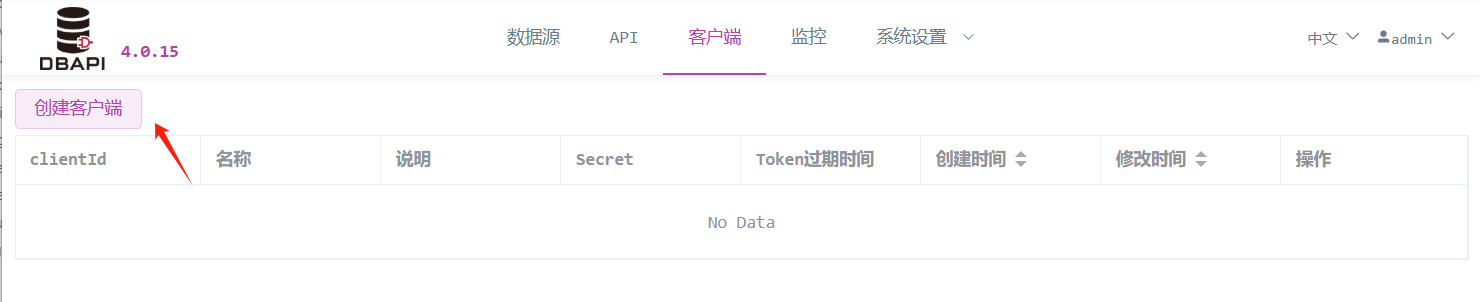
Client Management
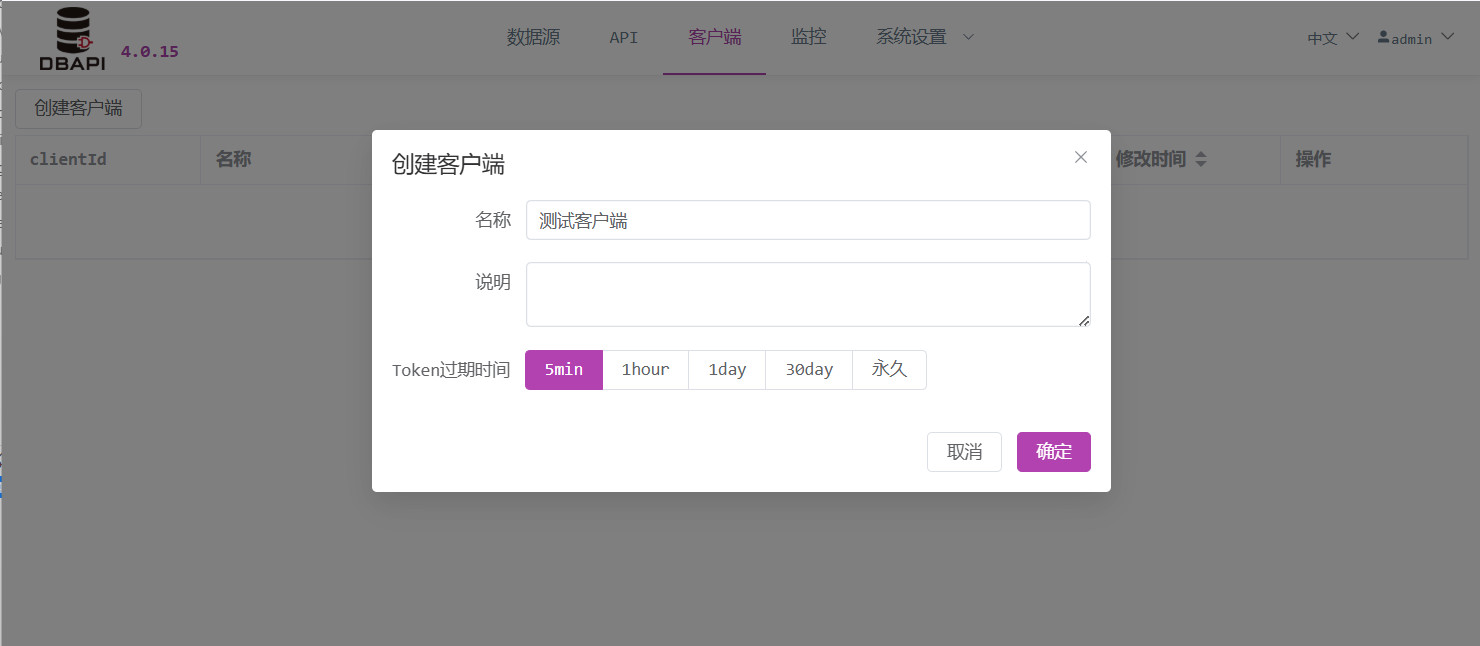
Click the "Client" menu and then the "Create Client" button.
Fill in the client information and save.
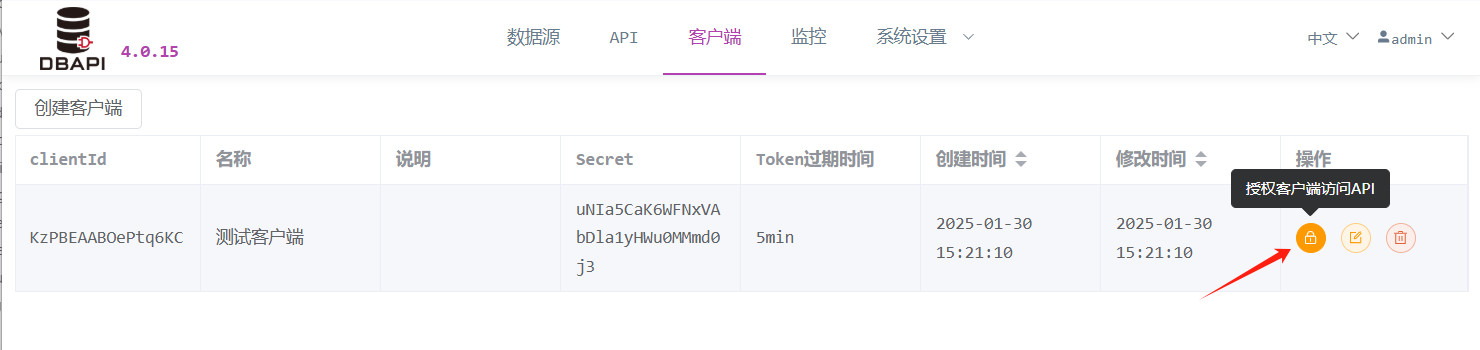
Creating a client generates a clientId and secret. The system administrator must inform the client (the API caller) of these values.
Clients use their own clientId and secret to access the endpoint http://192.168.xx.xx:8520/token/generate?clientId=xxx&secret=xxx to dynamically obtain a token. Only with this token can the client access private APIs (provided the system administrator has granted the client permission to access those private APIs).
When creating a client, set a token expiration time. Each token issued will have its own expiration date; within this validity period, the previously obtained token remains valid for accessing the API. Once expired, a new token must be requested.
TIP
To make a token permanently valid, set the expiration time to a very large value, such as 100 years.
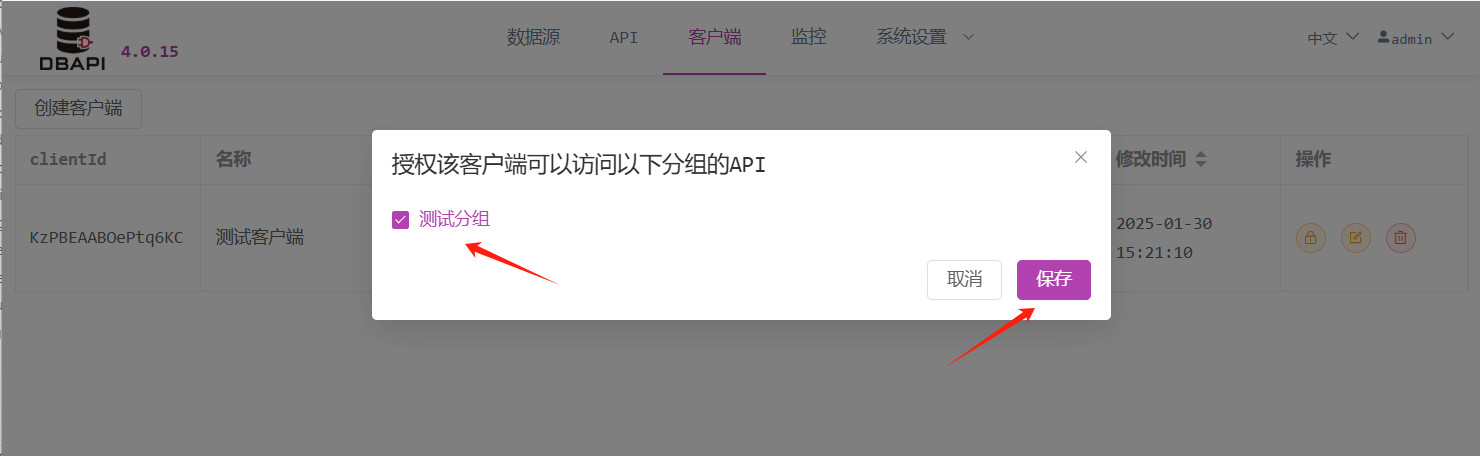
Click the "Authorize" button to grant the client access to specific APIs.
Select the desired API group and save.
Token Usage Instructions
Token Request Endpoint:
http://192.168.xx.xx:8520/token/generate?clientId=xxx&secret=xxxWhen calling private APIs, include the token value in the
Authorizationheader to successfully gain access. (For public APIs, no header is required.)Python Example:
import requests
headers = {"Authorization": "5ad0dcb4eb03d3b0b7e4b82ae0ba433f"}
re = requests.post("http://127.0.0.1:8520/api/userById", {"idList": [1, 2]}, headers=headers)
print(re.text)
Modify the previously created API to become a private API, then click "Request Test" again.
At this point, clicking "Send Request" reveals that the API is inaccessible.
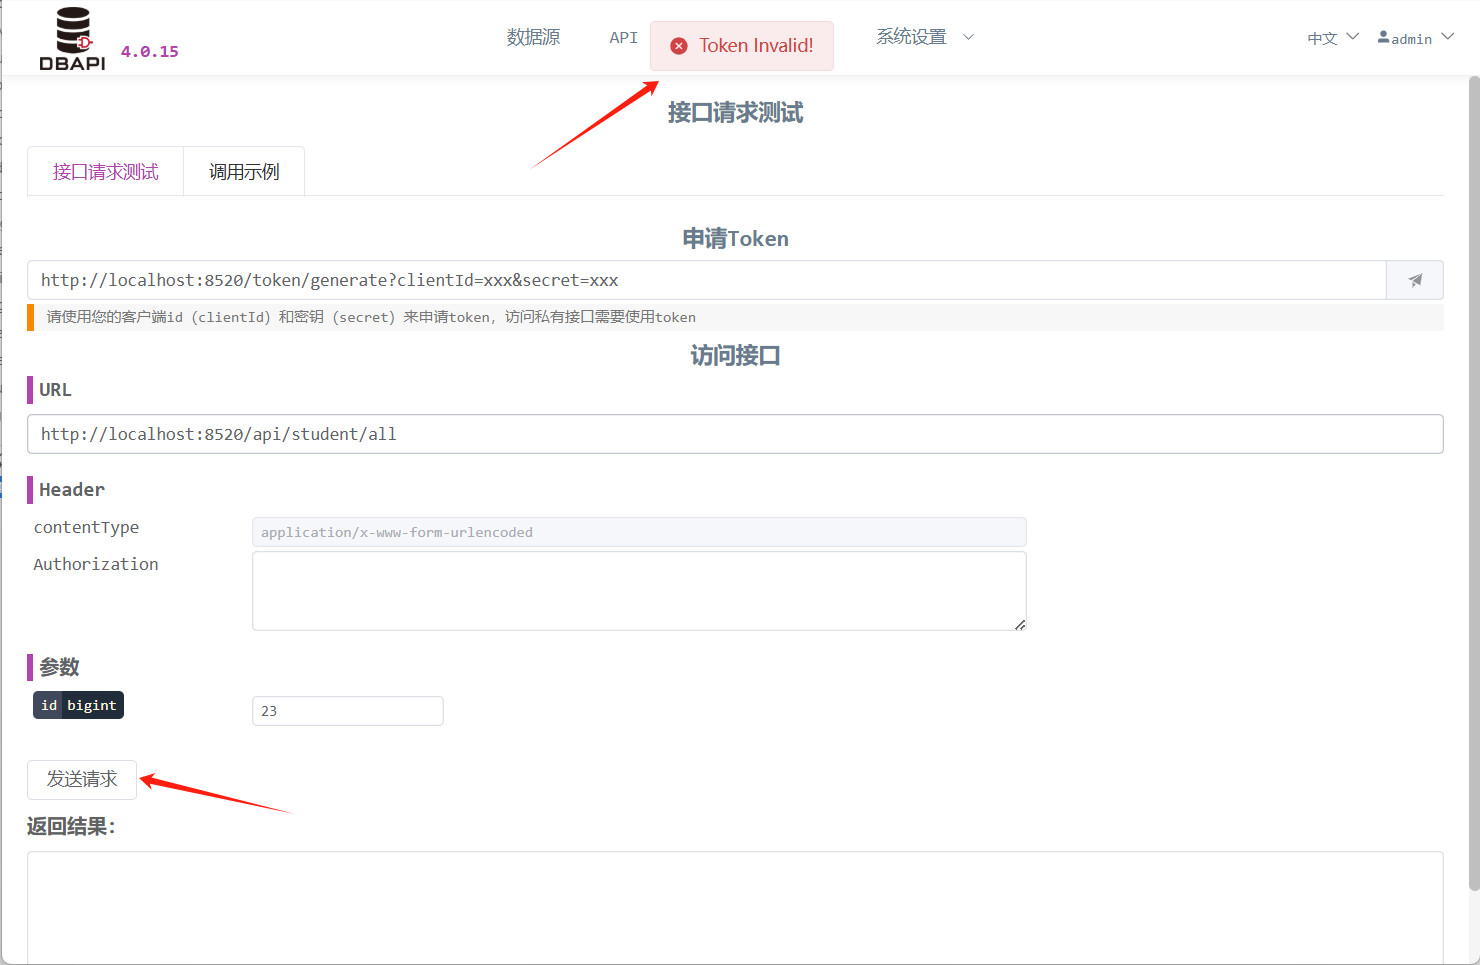
Enter the
clientIdandsecret, then click the button to retrieve the token.
Place the retrieved token in the
Authorizationheader, then click "Send Request" again. This time, the API is accessible.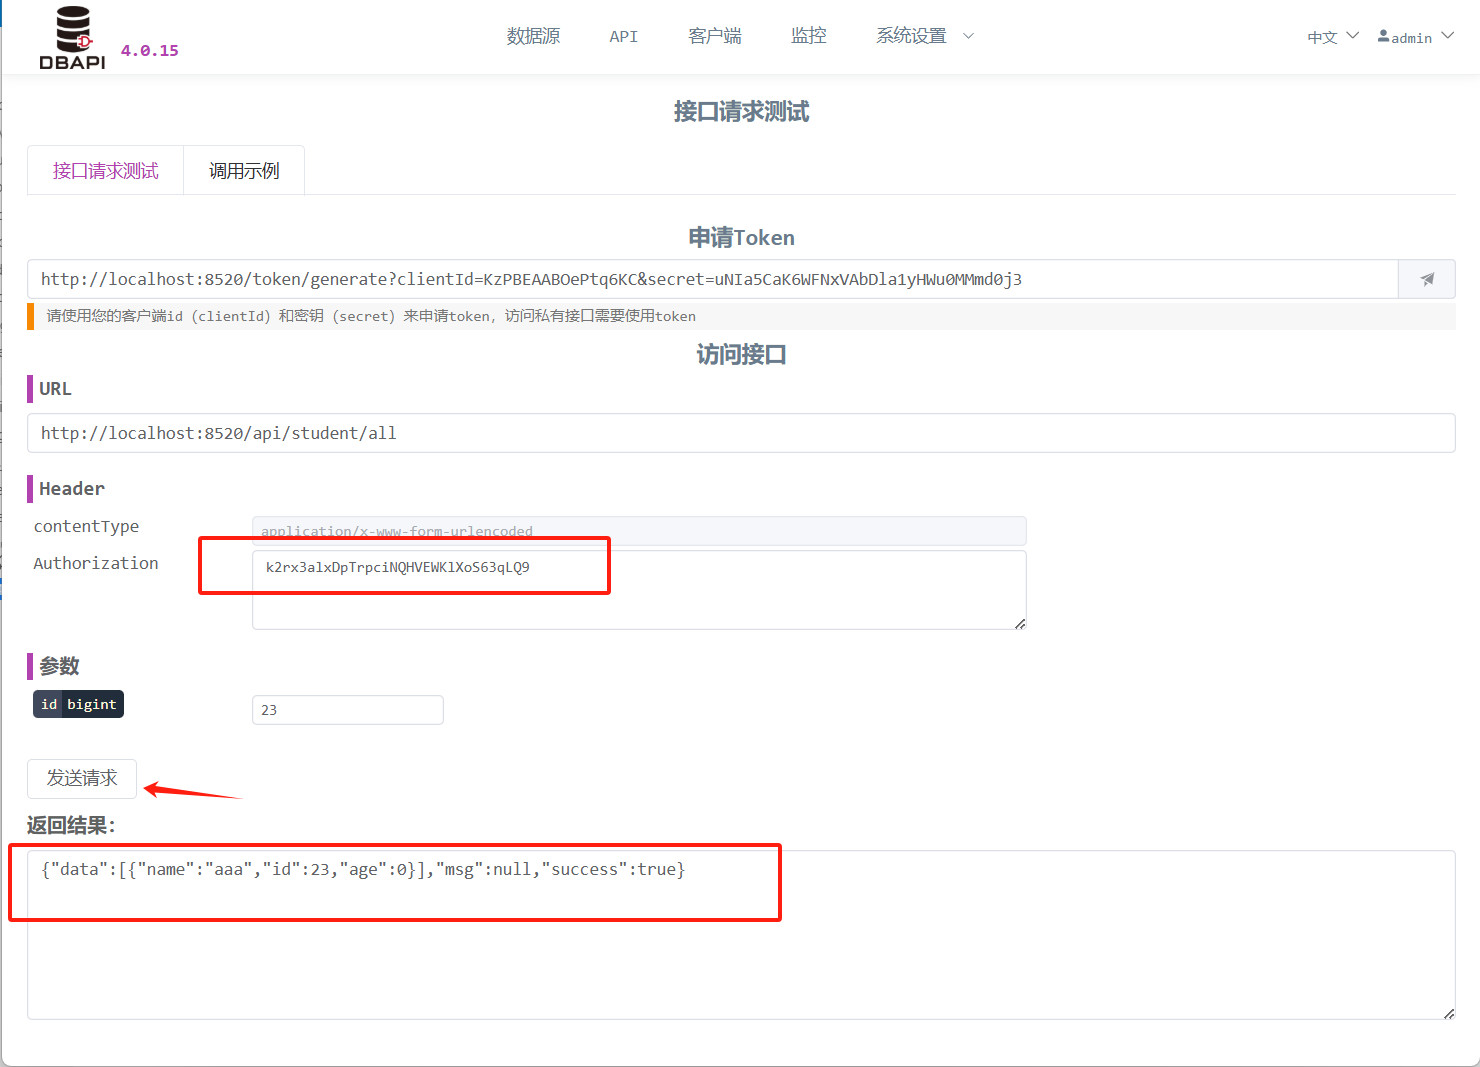
IP Firewall Settings
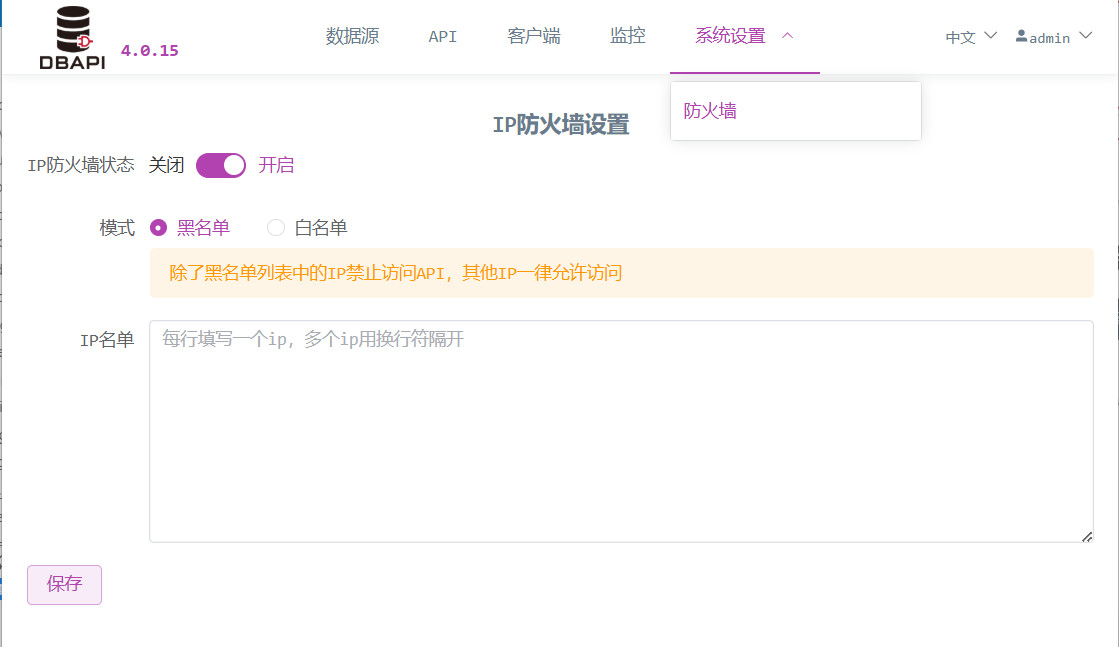
Enabling the firewall allows blocking specific IPs.
Monitoring
DBAPI can be used with only a metadata database (PostgreSQL, MySQL, SQLite). However, if you also want to use the monitoring features on the page—such as tracking API call logs, request counts, success rates, and so on—you must rely on an additional logging database (which you need to set up yourself) to store API access logs. We recommend using ClickHouse, MySQL, PostgreSQL, or Doris; of course, you can also use other relational databases.
Currently, initialization scripts for ClickHouse, MySQL, and PostgreSQL logging databases are provided in the sql directory.
NOTE
If you don't need the monitoring features, you don't have to set up a logging database. Simply configure access.log.writer=null in the conf/application.properties file. (The default configuration is already access.log.writer=null.)
Log Collection Methods
File-Based Collection: By default, DBAPI writes API access logs to the disk file
logs/dbapi-access.log. Users can then use tools like DataX or Flume to collect these logs into a logging database.Direct Database Writing: If you configure
access.log.writer=dbin theconf/application.propertiesfile, DBAPI will asynchronously write API access logs directly to the logging database. This method is suitable for scenarios with relatively low log volumes.Kafka Buffering: If you configure
access.log.writer=kafkain theconf/application.propertiesfile, DBAPI will write API access logs to Kafka. You'll need to manually collect these logs from Kafka into your logging database. This approach is ideal for high-volume logging scenarios, as Kafka can serve as a data buffer.
NOTE
Note that in this case, you must specify the Kafka address in the conf/application.properties file.
Additionally, DBAPI includes a built-in tool for consuming Kafka logs and writing them to the logging database. Please use the bin/dbapi-log-kafka2db.sh script.
Monitoring Summary
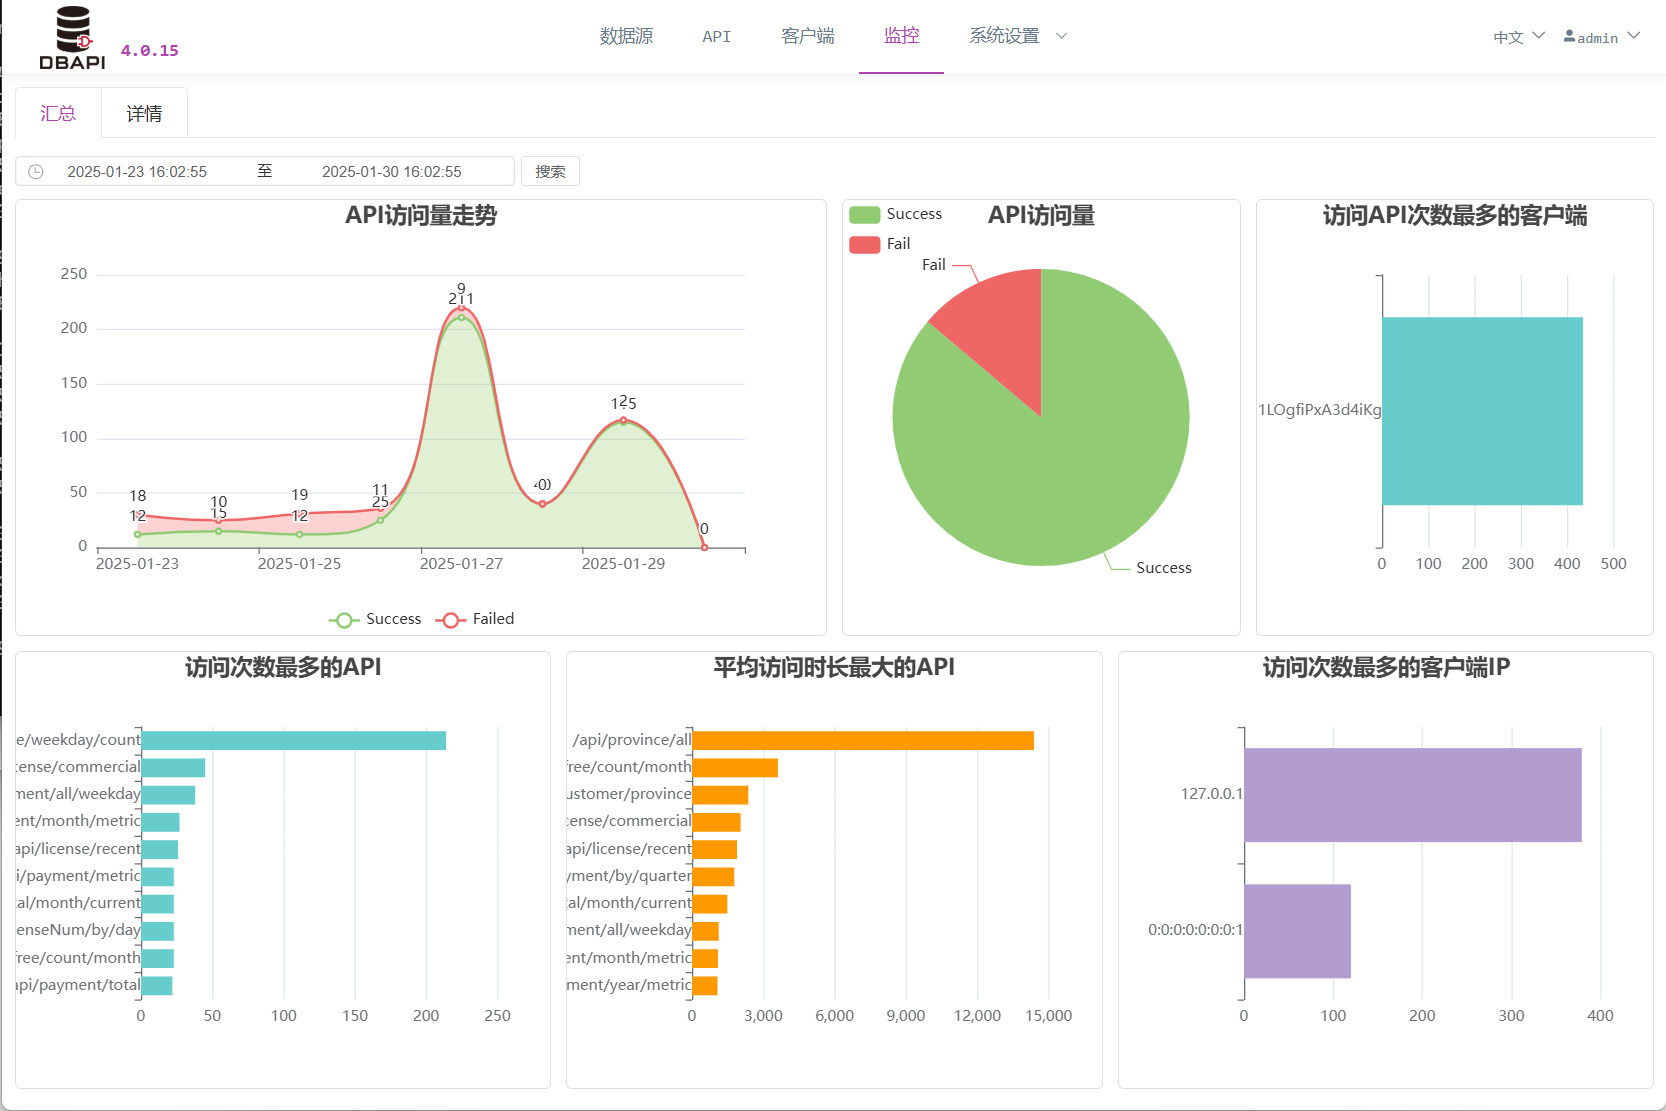
Click the "Monitoring" menu to view API call log metrics.
Viewing API Call Records
Click the "Details" tab to search API call records.

Other Features
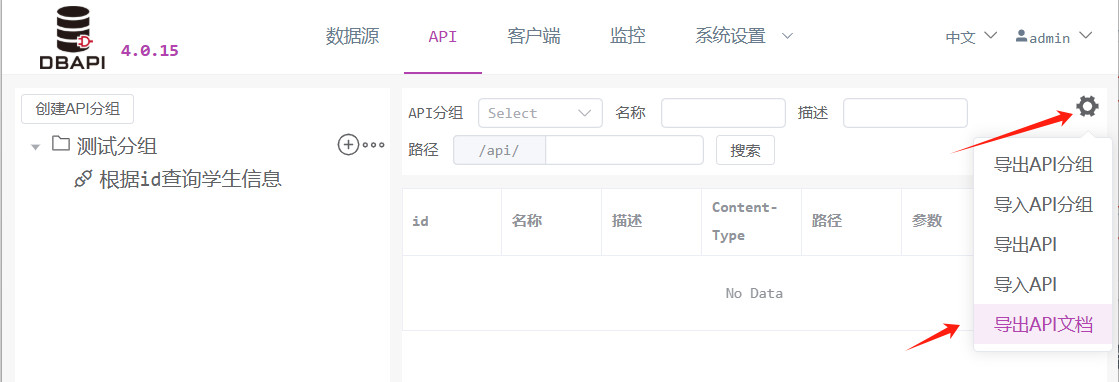
Exporting API Documentation
In the API menu, click the "Tools" button, then select "Export API Documentation."
Plugin System
DBAPI provides five types of plugin mechanisms. You can download plugins from the Plugin Market. If you wish to develop your own plugins, please refer to the Plugin Documentation.
Cache Plugin
- Caches the results of executor operations—for example, SQL executors cache query results to avoid frequent database queries and reduce database load.
- The caching logic is implemented by the user, who can store cached data in Ehcache, Redis, MongoDB, or other systems.
- When no data is found in the cache, the executor runs and caches the result afterward.
Multi-SQL Scenarios in SQL Executors
For SQL executors containing multiple SQL statements, the cache plugin encapsulates the results of all those SQL queries into a single unit (if individual SQL statements have conversion plugins configured, their results are converted first) before caching the entire result.
Alert Plugin
- When an internal error occurs within an API, the alert plugin can send notifications via email, SMS, DingTalk, Feishu, WeCom, or other channels.
- The alert logic is defined by the user.
Data Transformation Plugin
- Sometimes SQL cannot directly produce the desired data format. In such cases, users can write custom code to transform the data more conveniently. This is where data transformation plugins come into play.
- For example, user phone numbers or bank card numbers in SQL query results can be transformed or masked.
Multi-SQL Scenarios in SQL Executors
For SQL executors containing multiple SQL statements, each statement corresponds to its own data transformation plugin configuration. Each plugin processes the results of a single SQL query.
Global Data Transformation Plugin
- By default, APIs return data in the format
{success: true, msg: xxx, data: xxx}. - In some cases, the response format needs to be modified—for instance, when the front-end low-code framework AMIS requires every API response to include a
statusfield. In such situations, the global data transformation plugin can be used to uniformly modify the entire API's response format.
Difference Between Data Transformation Plugins and Global Data Transformation Plugins
Data transformation plugins modify the results of specific executor operations (e.g., converting the output of a SQL query), while global data transformation plugins alter the overall format of the entire API response.
Parameter Processing Plugin
- Allows users to customize how request parameters are handled.
- For example, converting all request parameter values to uppercase.
- Or decrypting encrypted parameters received by the API according to user-defined logic.
Version Support Notes
Parameter processing plugins are supported starting from Personal Edition version 4.0.16 and Enterprise Edition version 4.1.10.
Important Notes
Data Source Support
- If you plan to use Oracle or other types of data sources, manually place the corresponding JDBC driver JAR files into the
extliborlibdirectory after deploying DBAPI. (For cluster deployments, each node must manually add the JAR files.) - We recommend placing the drivers in the
extlibdirectory for easier centralized management.
SQL Writing Guidelines
- Similar to MyBatis dynamic SQL syntax, DBAPI supports parameter placeholders
#{}and${}, and allows direct SQL writing without needing outer tags like<select>or<update>. Refer to the Dynamic SQL Syntax Documentation. - As with MyBatis, ensure that less-than signs (
<) in SQL are written as<.