# DBAPI User Guide
# Product Introduction
DBAPI is a low-code tool for developers. It allows you to write SQL and configure parameters on the page to automatically generate rest APIs. It helps programmers quickly develop backend data services, especially for BI reports or dashboard backend service development.
DBAPI is the data service management center for enterprise. It provides dynamic creation and publishing functions for APIs, unified management of APIs, and client management capabilities. It can monitor client calls to APIs and control client permissions for accessing APIs.
Demo Address: Demo (opens new window), default account password: admin/admin
# Core Features
- ✅ Ready to use: No programming required, does not depend on other software (standalone mode only requires Java runtime environment)
- ✅ Lightweight deployment: Extremely low resource consumption, can run stably on a server with 2 core and 4 GB of memory
- ✅ Multi-platform support: Supports standalone and cluster modes, supports Windows, Linux, macOS
- ✅ Dynamic configuration: Supports dynamic creation and modification of APIs and data sources, hot deployment without perception
- ✅ Access control: Provides API-level access permission management, supports IP whitelist/blacklist
- ✅ Wide compatibility: Supports all types of databases (MySQL, SQL Server, PostgreSQL, Oracle, Hive, Dameng, Kingbase, Doris, OceanBase, GaussDB, etc.)
- ✅ Dynamic SQL: Supports MyBatis-style dynamic SQL, provides integrated SQL editing, execution, and debugging functions
- ✅ All Statements: Supports Select/Insert/Update/Delete statements and stored procedure calls
- ✅ Transaction management: Supports multi-SQL execution, supports transaction
- ✅ Plugin extension: Provides rich plugins for caching, data transformation, failure alarms, parameter processing, etc.
- ✅ Easy migration: Supports API configuration import/export, facilitating migration from test environment to production environment
- ✅ Parameter processing: Supports API parameter passing and complex nested JSON parameter passing, supports parameter validation
- ✅ Monitoring statistics: Provides API call record query and access information statistics functions
- ✅ Traffic control: Supports API rate limiting
- ✅ Process orchestration: Supports complex API orchestration functions
- ✅ Open integration: Provides OpenAPI for easy integration with other systems
# Basic Concepts
# Executor
Executor is an abstraction of API business logic execution, currently supporting multiple types:
| Executor Type | Function Description |
|---|---|
| SQL Executor | Executes SQL statements in the database and returns results |
| Elasticsearch Executor | Executes Elasticsearch DSL queries and returns results |
| HTTP Executor | Acts as a gateway proxy to forward HTTP requests and return results |
Personal edition currently only supports SQL Executor
# API Group
Used for classifying and managing APIs, grouping business-related APIs together for easy maintenance and searching.
# Client
The application that call APIs, such as Python program, Java program, etc. Each client has a unique clientId and secret, created by the system administrator and assigned API access permissions.
# Quick Start
# System Login
Login to the system using default account password admin/admin.
# Data Source Configuration
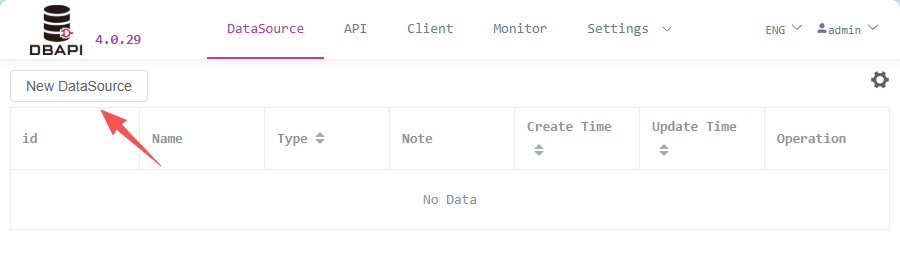
Go to the data source page and click "New DataSource"
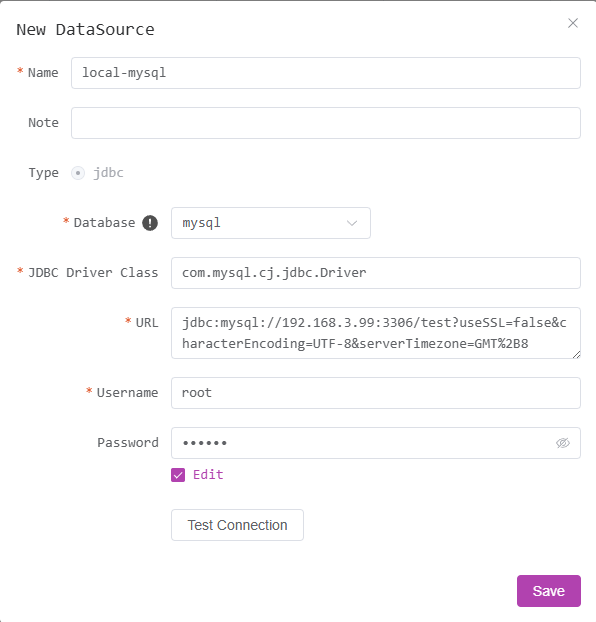
Fill in database connection information and save
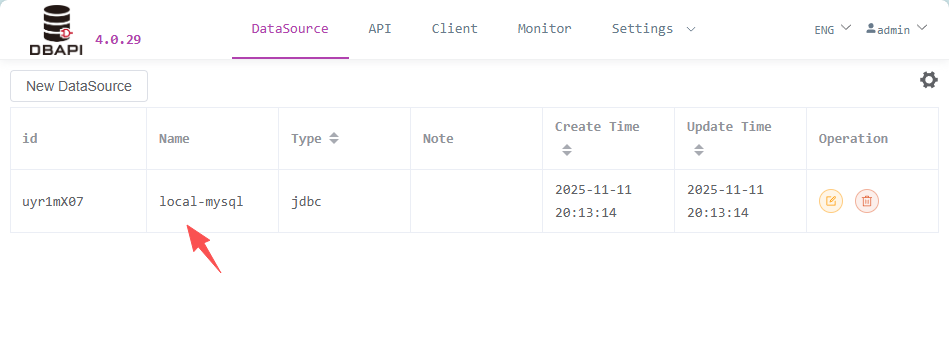
After saving, return to the data source page where you can edit or delete the newly created data source
Important Notes:
- Supports all types of databases with JDBC protocol
- When using other types of databases or Oracle, you need to manually fill in the JDBC driver class name and place the corresponding JDBC driver JAR package in the
extliborlibdirectory, then restart the DBAPI (for cluster mode, all nodes need to perform this operation)- The
libdirectory already has built-in drivers for MySQL/SQL Server/PostgreSQL/ClickHouse. Please manually replace them if versions don't match- It is recommended to put your own driver JAR packages in the
extlibdirectory for unified management
# API Creation Process
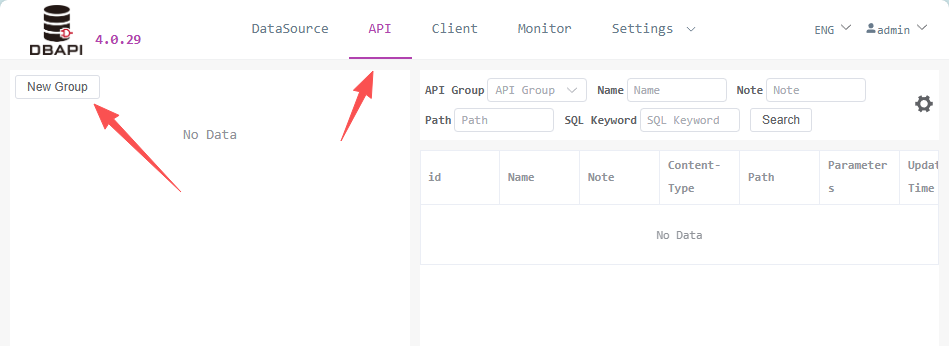
# 1. Create API Group
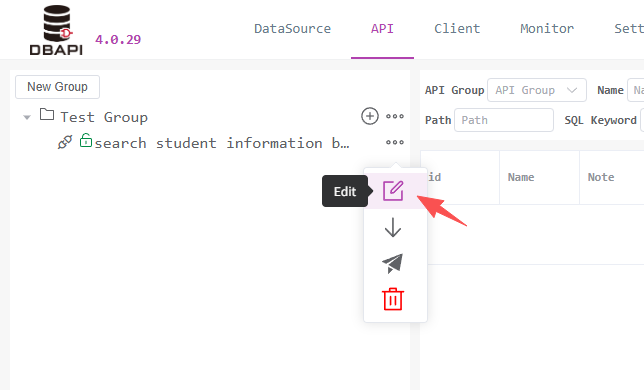
Go to the API page and click "New Group" on the left
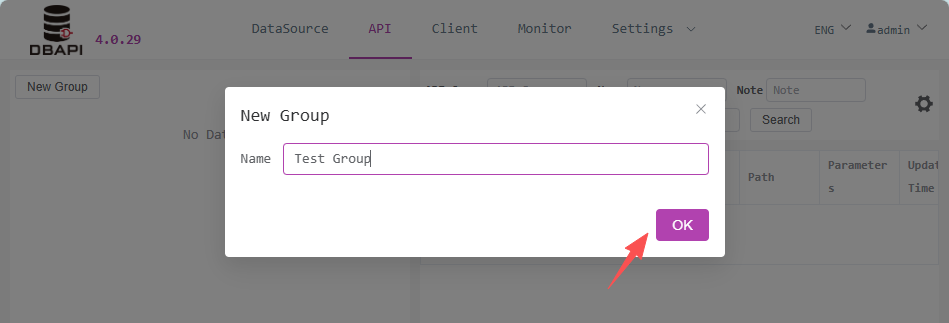
Fill in the group name in the pop-up window and save
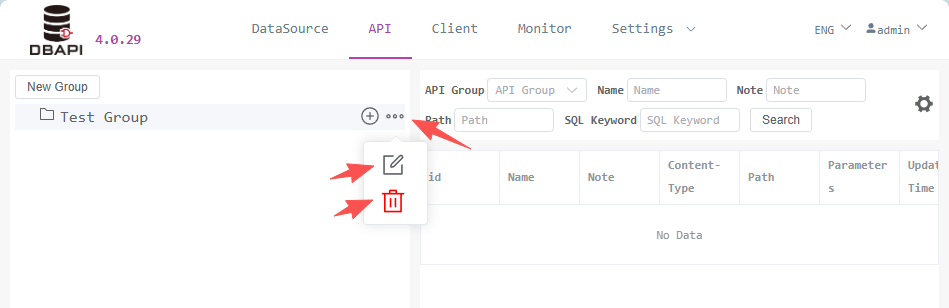
After saving, you'll find a new group on the left sidebar. Click the more button on the group to edit or delete the group
# 2. Create API
Click the "New API" button in the target group to enter the configuration page

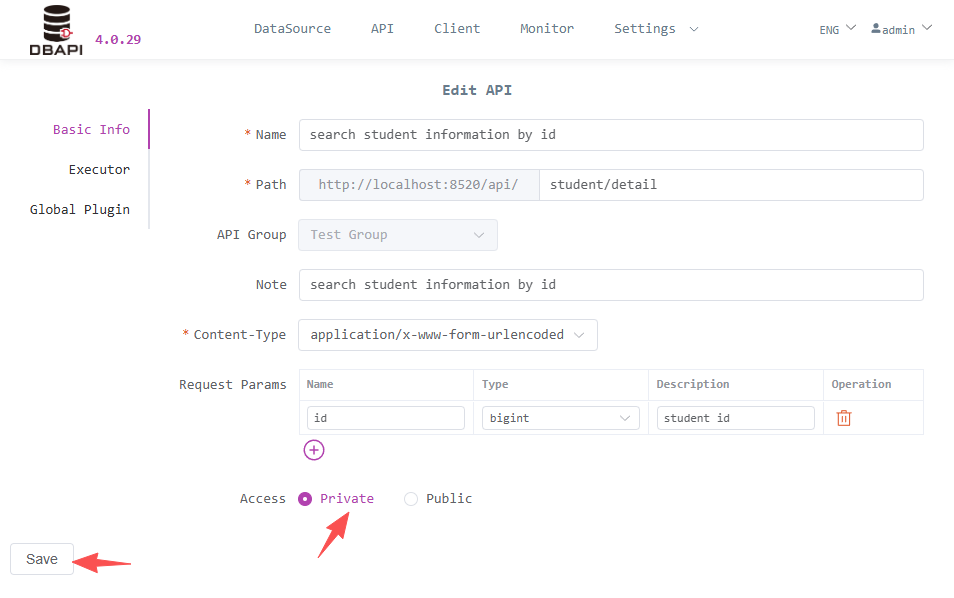
Click Basic Information tab and fill in the API basic information

Access Permissions: Public API can be accessed directly, private API require clients to apply for a token to access (let's choose public API here for convenient testing later)
Content-Type: For
application/x-www-form-urlencodedtype APIs, parameters need to be configured; forapplication/jsontype APIs, JSON parameter examples need to be filled in.Click Executor tab and fill in executor information
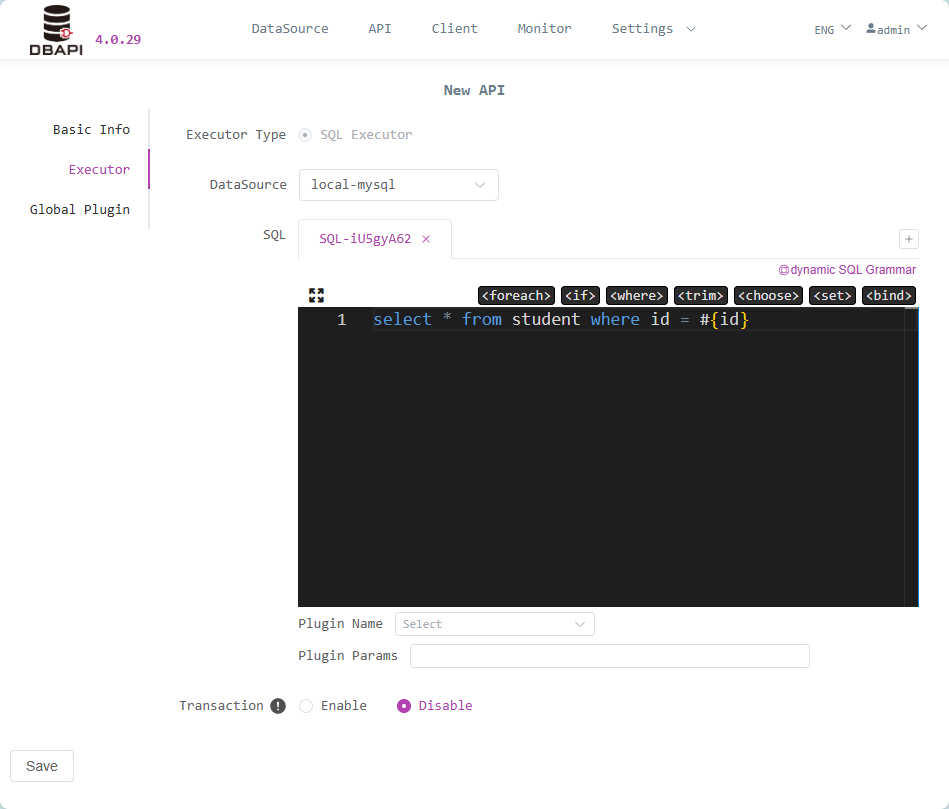
SQL Writing: Uses MyBatis dynamic SQL syntax (without outer
<select><insert><delete><update>tags). Parameters are represented by#{}or${}. Refer to Dynamic SQL Syntax Documentation for dynamic SQL syntaxTransaction Control: Transactions are disabled by default. For insert/update/delete statements, it's recommended to enable transactions. When enabled, if SQL execution fails, the transaction will be rolled back. If an API contains multiple SQL statements, enabling transactions will execute all SQL statements within one transaction
Important Tip: For databases like HIVE that don't support transactions, do not enable transactions, otherwise errors will occur
Data Transformation: If data transformation is needed, fill in the Java class name of the data transformation plugin. Leave blank for no transformation. If the plugin requires parameters, fill in the parameters.
Multi-SQL Support: Click the add button to add SQL. An API can execute multiple SQL statements, with multiple results packaged together and returned. For example, pagination queries where both details and total count need to be queried. Only one SQL can be written in per SQL editing window.

Important Note: If an executor contains multiple SQL statements, each SQL will correspond to a data transformation plugin configuration. Data transformation plugins always transform the result of a single SQL query.
Click the window maximize button to enter the SQL debugging Page
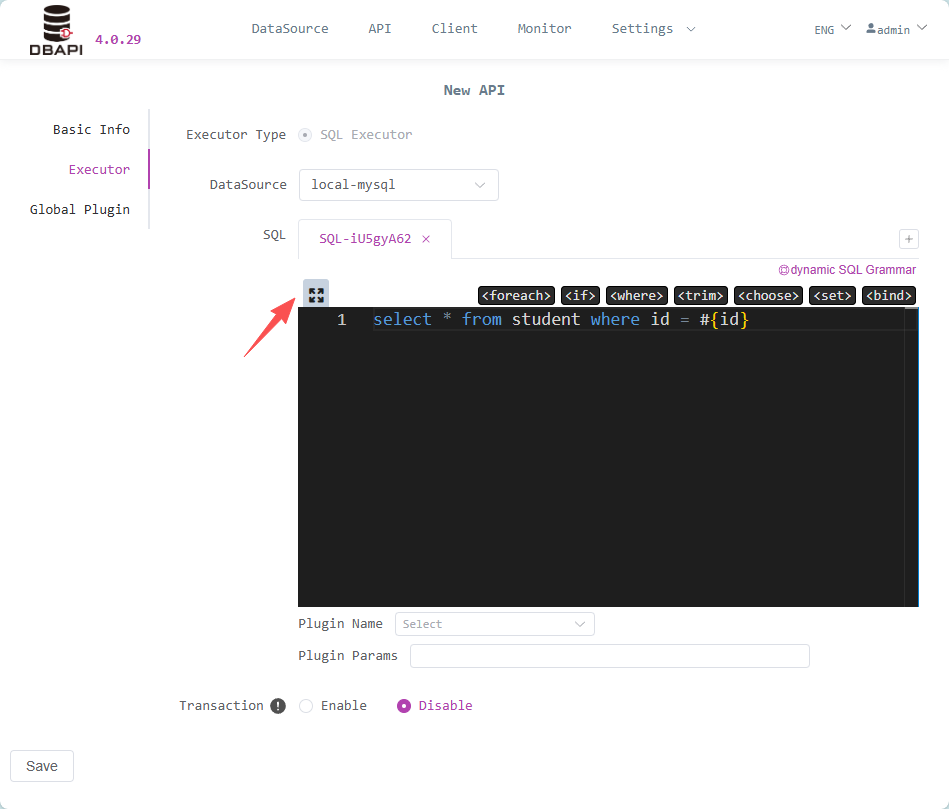
Click Run SQL to execute SQL. If SQL contains parameters, parameters need to be set

Click Global Plugins and fill in global plugin information
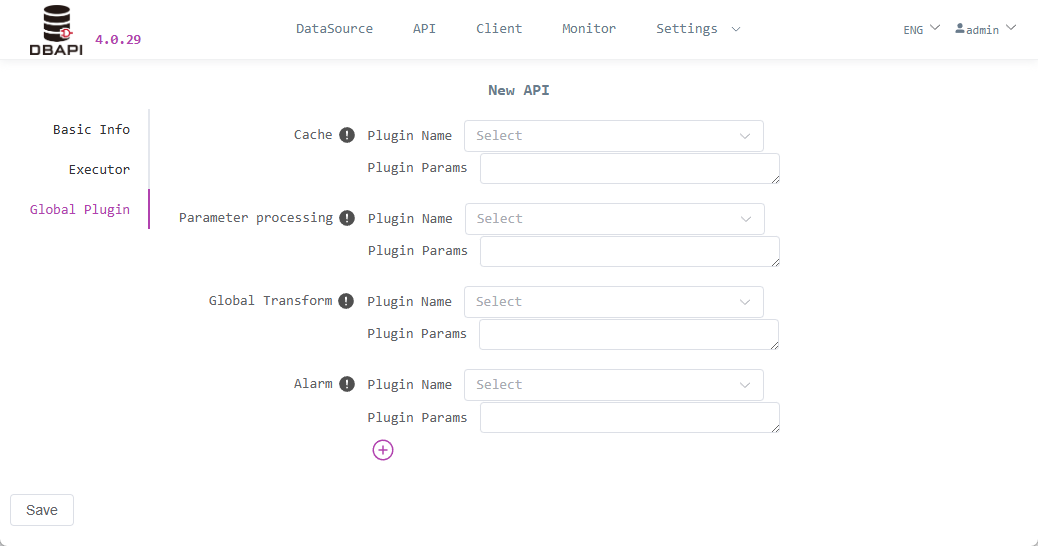
Cache: If data caching is needed, fill in the Java class name of the cache plugin. Leave blank to disable caching. If the plugin requires parameters, fill in the parameters.
Alarm: If you need alarms when API execution fails, fill in the Java class name of the alarm plugin. Leave blank to disable failure alerts. If the plugin requires parameters, fill in the parameters.
Global Data Transformation: If data transformation is needed, fill in the Java class name of the data transformation plugin. Leave blank for no transformation. If the plugin requires parameters, fill in the parameters.
Parameter Processing: If parameter processing is needed, fill in the Java class name of the parameter processing plugin. Leave blank for no processing. If the plugin requires parameters, fill in the parameters.
Click Save to create the API, then click the API menu to return to the API list page
# 3. API Publishing
Click the more button on the API to expand the publishing button, then click the publishing button to publish the API

Click the more button on the API to expand the request test button, then click the request test button to enter the request test page

Click the send request button to request the API. If there are parameters, please fill in the parameters

# Client Management
Click the client menu and click the new client button

Fill in client information and save
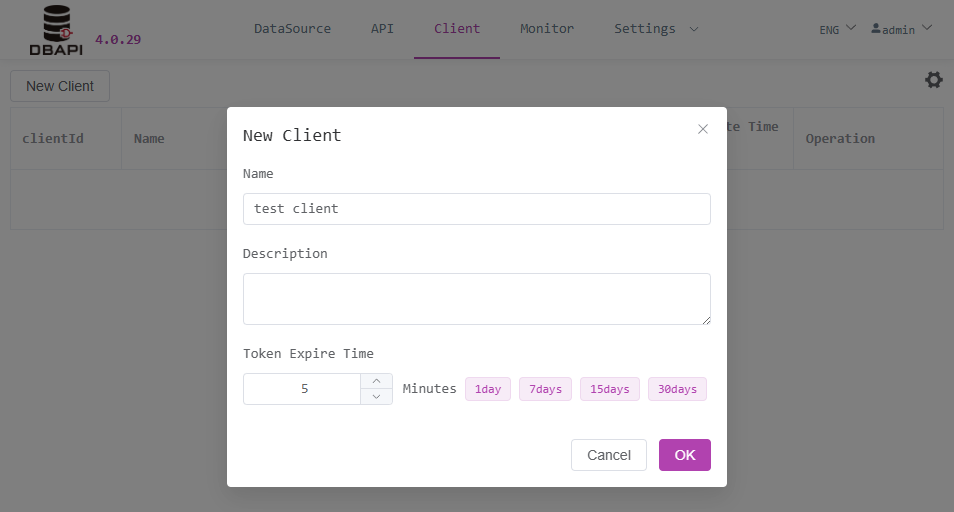
Creating a client generates clientId and secret. The system administrator needs to inform the client (API caller) of the clientId and secret.
Clients use their own clientId and secret to access the http://192.168.xx.xx:8520/token/generate?clientId=xxx&secret=xxx API to dynamically obtain a token. Clients can only access private APIs using this token (provided that the system administrator has authorized the client to access this private API).
When creating a client, the token expiration time must be set. In the future, each token applied for by the client will have a corresponding expiration time. Within this validity period, using the previously token to access APIs will be valid. Otherwise, after the expiration time, a new token must be applied for.
If you want tokens to be permanently valid, please set the expiration time to a large value, such as 100 years
Click the authorization button to authorize APIs for the client

Select the groups to authorize and save

# Token Usage Instructions
API for token generation:
http://192.168.xx.xx:8520/token/generate?clientId=xxx&secret=xxxWhen requesting private APIs, the token needs to be placed in the
Authorizationheader to access successfully. (For public APIs, no header setting is required)Python Call Example:
import requests
headers = {"Authorization": "5ad0dcb4eb03d3b0b7e4b82ae0ba433f"}
re = requests.post("http://127.0.0.1:8520/API/userById", {"idList": [1, 2]}, headers=headers)
print(re.text)
Modify the previous API to a private API, then click the request test button
At this point, clicking the send request button shows that the API is inaccessible
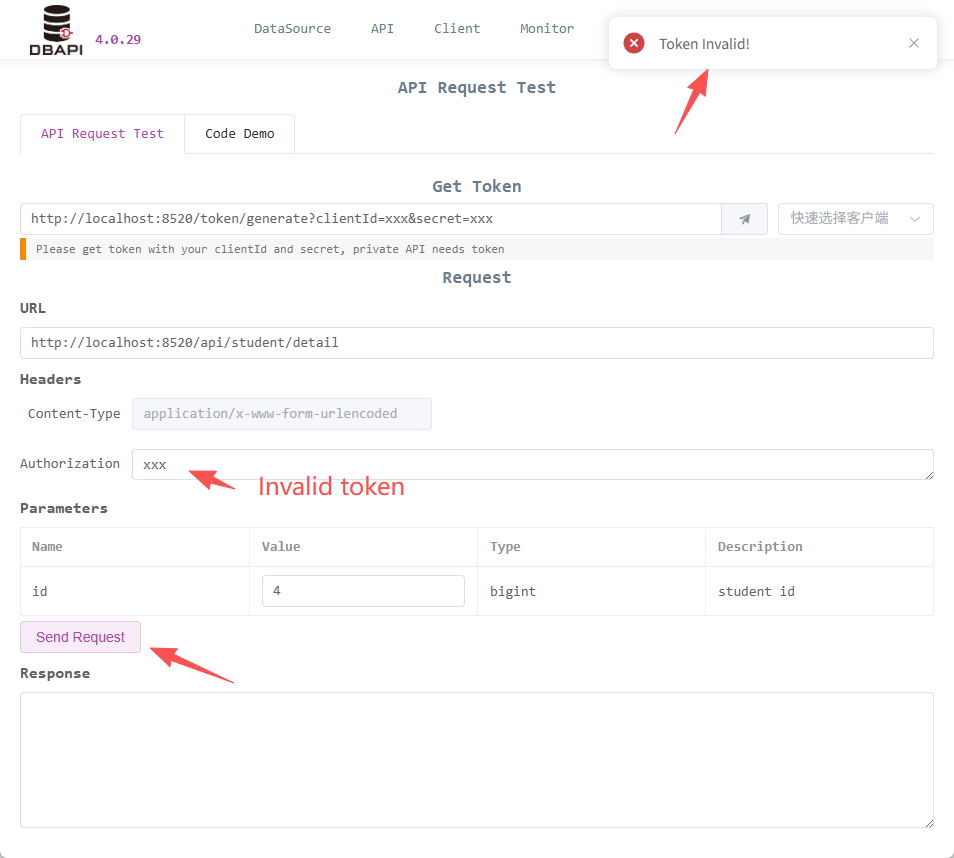
Fill in
clientIdandsecret, click the button to access the API and obtaintoken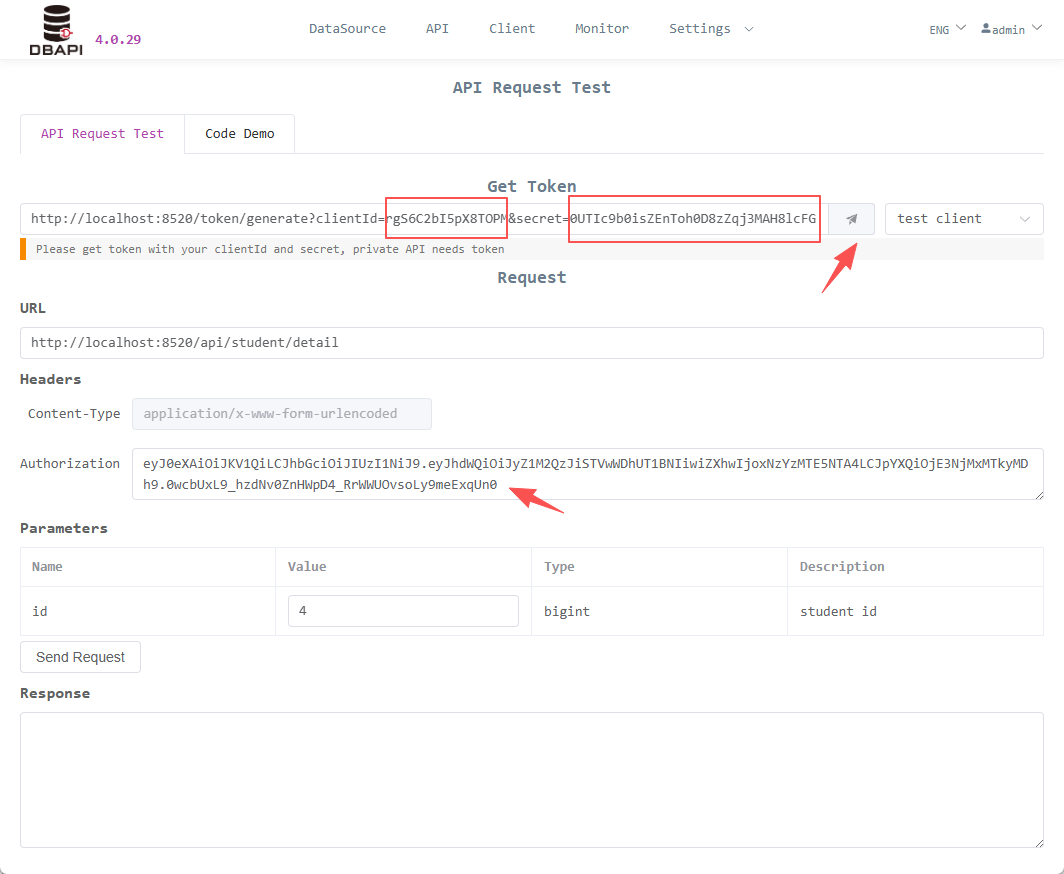
Fill the
tokeninto theAuthorizationheader, click the send request button, and the API access is successful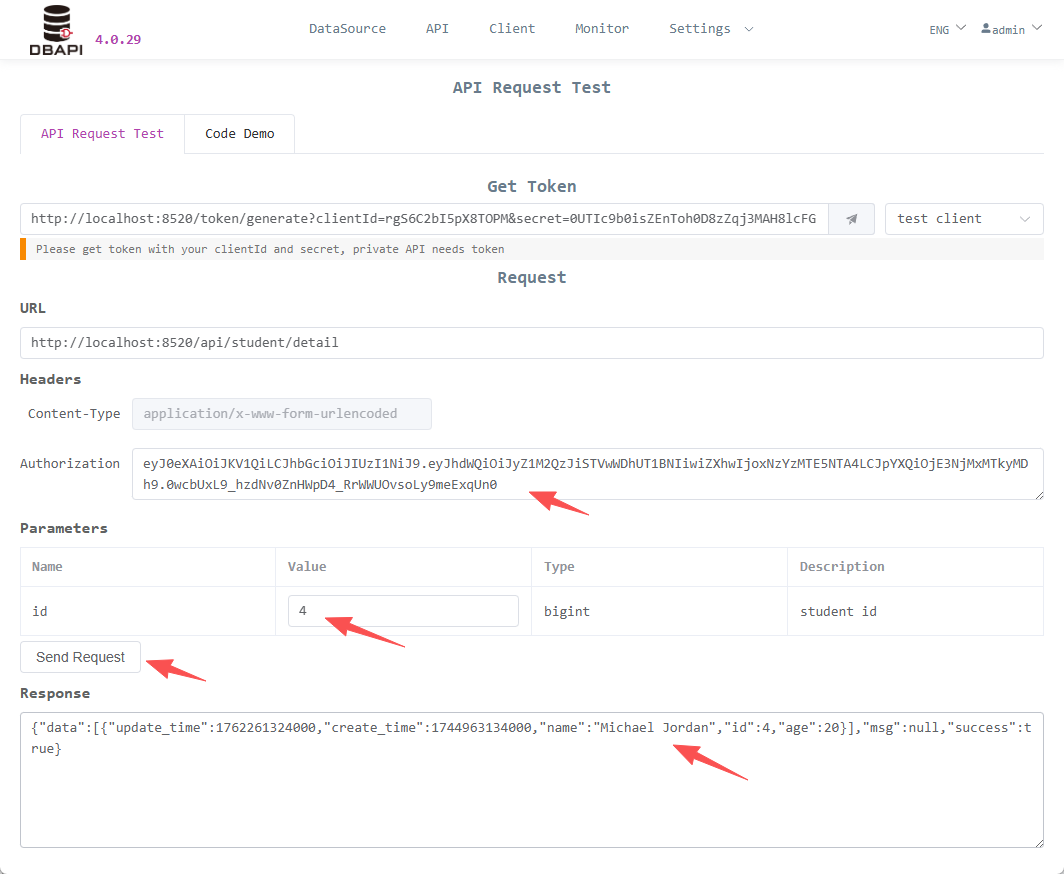
# IP Firewall Settings
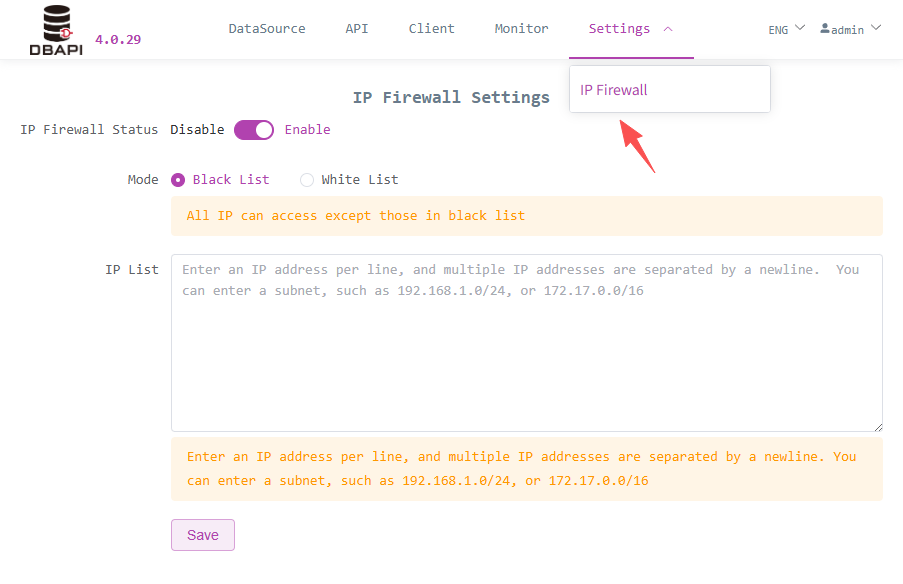
Enabling the firewall can intercept IPs
# Monitoring
DBAPI can be used with only the metadata database (mysql/sqlite), but if you also want to use the monitoring functions on the page (monitoring API access records, traffic, success rate, etc.), you must rely on another log database (which users need to set up themselves) to store API access logs. ClickHouse is recommended, but you can also use other relational databases.
Currently, initialization scripts for clickhouse/mysql log databases are provided in the
sqldirectory
# Log Collection Methods
File Collection: DBAPI will write API access logs to disk file
logs/dbapi-access.logby default. Users can use tools likedataxflumeto collect logs to the log database.Direct Database Connection: If
access.log.writer=dbis configured in theconf/application.propertiesfile, DBAPI will write API access logs directly to the log database. This method is suitable for scenarios with not too large log volumes.Kafka Buffer: If
access.log.writer=kafkais configured in theconf/application.propertiesfile, DBAPI will write API access logs to Kafka. Users need to collect logs from Kafka to the log database themselves. This method is suitable for scenarios with large log volumes, where Kafka can serve as a data buffer.Note that with this method, you need to fill in the Kafka address in the
conf/application.propertiesfile.DBAPI also provides a tool to consume Kafka logs and write them to the log database. Please use the
bin/dbapi-log-kafka2db.shscript.
If you don't need to use monitoring functions, you don't need to set up a log database, and you can configure
access.log.writer=null. (The default configuration isaccess.log.writer=null)
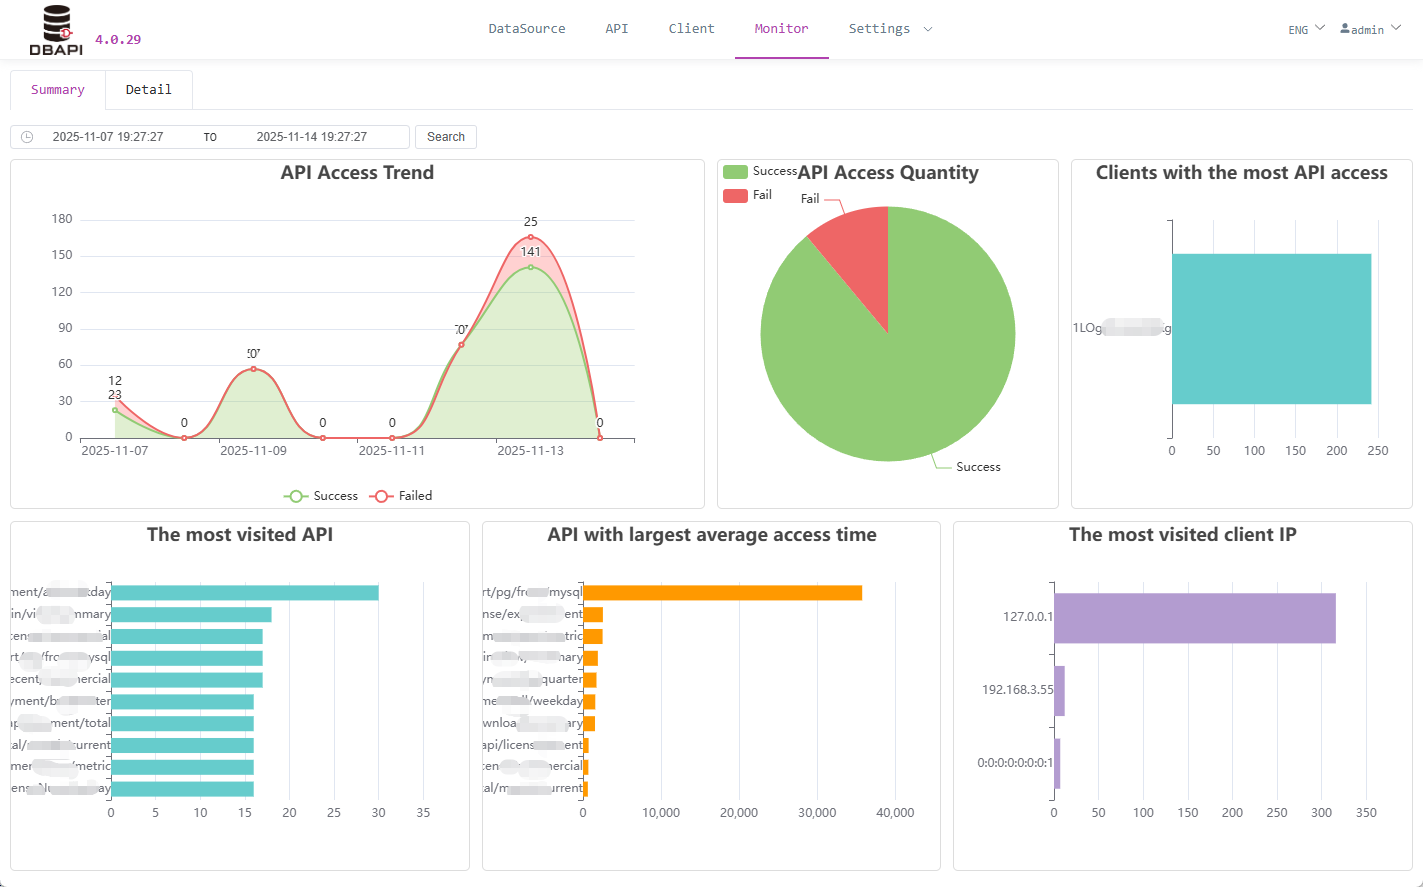
# Monitoring Summary
Click the monitoring menu to view API access logs monitoring
# View API Access Logs
- Click the details tab to search API access logs

# Other Functions
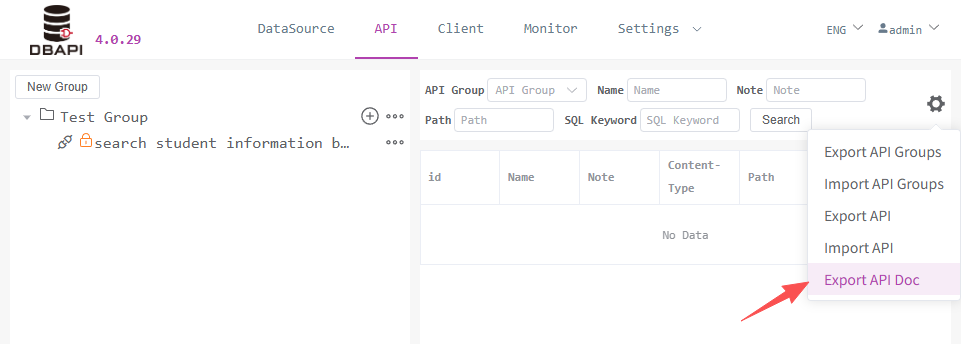
# Export API Documentation
Click the tools button in the API menu, then click the export API documentation button
# Plugins
DBAPI provides 5 types of plugins. You can download plugins from the Plugin Market (opens new window).
# Cache Plugin
- Caches executor results, such as SQL executor, for query-type SQL, caches SQL query results to avoid frequent database queries and reduce database pressure.
- Cache logic is written by users, who can cache to ehcache/redis/mongodb, etc.
- When data cannot be found in the cache, the executor is executed, and the results are cached.
SQL Executor Multi-SQL Scenario: For SQL executors, if an executor contains multiple SQL statements, the cache plugin caches the packaged overall result of multiple SQL executions (if a single SQL is configured with a transformation plugin, the result will be transformed first) as a whole.
# Alarm Plugin
- When an API internal error occurs, the alarm plugin can send alarm notifications, such as emails, SMS, DingTalk, Feishu, WeChat, etc.
- Alarm logic is written by users.
# Data Transformation Plugin
- Sometimes SQL cannot obtain the desired data format in one go. If using code to process and transform data is more convenient, the data transformation plugin should be used. Users write the code for data transformation.
- For example, transforming user phone numbers and bank card numbers in SQL query results for desensitization.
SQL Executor Multi-SQL Scenario: For SQL executors, if an executor contains multiple SQL statements, each SQL corresponds to a data transformation plugin configuration. Data transformation plugins always transform the result of a single SQL query.
# Global Data Transformation Plugin
- The default API return data format is
{success: true, msg: xxx, data: xxx} - In some cases, the response data format needs to be transformed, such as the low-code framework
AMISwhich requires the API response data to carry thestatusfield. In this case, the global data transformation plugin can be used to transform the entire response data format of the API.
Plugin Difference Explanation: Note the difference between data transformation plugins and global data transformation plugins. Data transformation plugins transform the execution results of the executors (such as transforming the results of SQL executor executing query SQL), while global data transformation plugins transform the entire response data format of the API.
# Parameter Processing Plugin
- Processes request parameters with user-defined logic
- For example, converting all request parameter values to uppercase
- For example, APIs receiving encrypted parameters, users define logic to decrypt parameter values
Version Support Note: Note that parameter processing plugins are supported from personal edition
4.0.16and enterprise edition4.1.10
# Notes
# Data Source Support
- If you want to use Oracle or other types of data sources, please manually place the corresponding JDBC driver package in the
extlibdirectory orlibdirectory after deploying DBAPI (for cluster deployment, each node needs to manually place the JAR package) - Recommended to place in the
extlibdirectory for unified management
# SQL Writing Syntax
- Same as MyBatis dynamic SQL syntax, also supports parameters
#{}and${}. Refer to Dynamic SQL Syntax Documentation. No need to write the outer<select><update><insert><delete>tags, just write the SQL content directly - Note that like MyBatis, the less-than sign in SQL should not be written as
<, but as<